一文讲透springboot的入门、原理

Springboot入门#

背景#

演进过程:#

  • 传统web开发(servlet2.5以下),web项目必须要一个web.xml,里面配置

    • <listener>:配置一个在web容器启动时可以执行的类(如ContextLoadListener去初始化spring,需要制定参数去加载类似applicatoinContext.xml文件,扫描业务service、dao,或者<bean>单个定义)

    • ContextLoadListener参数中要去指定加载的配置文件,如applicationContext.xml,里面通过<bean>去指定对象装配注入,或通过去批量扫描业务类

    • <servlet><servlet-mapping>:配置web容器从接管的请求处理类和对应请求映射规则(DispatherServlet去接管请求到springMVC),参数扫描springMvc.xml去批量扫描Controller,配置产生HttpMessageConverterViewResovler

    • <filter><filter-mapping>:配置对请求的过滤类和映射规则

  • 以上配置繁琐,第二种方式:

    • @WebServlet(urlmapping)、
  • 第三种,JavaConfig方式:

  • spring使用servlet3.1的SPI机制,在META-INF/services/javax.servlet.ServletContainerInitializer下面的文件里面配置了Spring的initial类,是ServletApi的一个实现。web容器启动会去执行他,这个Spring的初始化器又会找到所有WebApplicationInitializer接口实现,挨着执行OnStartup(委托代理)

springboot是建立在spring framework上的。传统我们的spring framework最开始是xml-based,然后annotation-based,最后javaconfig-based

快速开始#

  • 新建一个maven项目,然后去spring.iohttps://spring.io/quickstart官方会指引到https://start.spring.io选择springboot版本,即可生成pom文件甚至Java基础启动文件。

image-20200711162055034

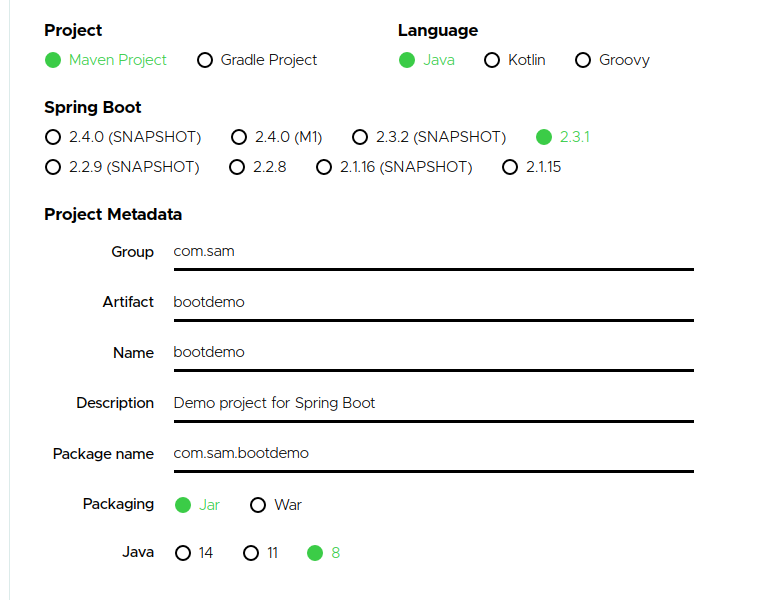
点击下方EXPLORECTRL + SPACE会给你展示生成的项目结构和pom文件预览。点击GENERATECTRL + ⏎则会下载一个生成的zip包。

一般我们选用前者,我们在右边添加了web(springboot-web)lombok后,copy一段生成的pom.xml即可:

1
2
3
4
5
6
7
8
9
10
11
12
13
14
15
16
17
18
19
20
21
22
23
24
25
26
27
28
29
30
31
32
33
34
35
36
37
38
39
40
41
42
43
44
45
46
47
48
49
50
51
52
53
54
55
56
<?xml version="1.0" encoding="UTF-8"?>
<project xmlns="http://maven.apache.org/POM/4.0.0" xmlns:xsi="http://www.w3.org/2001/XMLSchema-instance"
xsi:schemaLocation="http://maven.apache.org/POM/4.0.0 https://maven.apache.org/xsd/maven-4.0.0.xsd">
<modelVersion>4.0.0</modelVersion>
<!-- 这里是依赖了一个springboot的父项目 -->
<parent>
<groupId>org.springframework.boot</groupId>
<artifactId>spring-boot-starter-parent</artifactId>
<version>2.3.1.RELEASE</version>
<relativePath/> <!-- lookup parent from repository -->
</parent>

<groupId>com.sam</groupId>
<artifactId>bootdemo</artifactId>
<version>0.0.1-SNAPSHOT</version>
<name>bootdemo</name>
<description>Demo project for Spring Boot</description>

<properties>
<java.version>1.8</java.version>
</properties>


<dependencies>
<dependency>
<groupId>org.springframework.boot</groupId>
<artifactId>spring-boot-starter-web</artifactId>
</dependency>
<dependency>
<groupId>org.projectlombok</groupId>
<artifactId>lombok</artifactId>
<optional>true</optional>
</dependency>
<dependency>
<groupId>org.springframework.boot</groupId>
<artifactId>spring-boot-starter-test</artifactId>
<scope>test</scope>
<exclusions>
<exclusion>
<groupId>org.junit.vintage</groupId>
<artifactId>junit-vintage-engine</artifactId>
</exclusion>
</exclusions>
</dependency>
</dependencies>

<build>
<plugins>
<plugin>
<groupId>org.springframework.boot</groupId>
<artifactId>spring-boot-maven-plugin</artifactId>
</plugin>
</plugins>
</build>

</project>

看起来只有很简单的web-starterlombok甚至连版本号都没有指定,但其实有很核心的一个父项目:

1
2
3
4
5
6
<parent>
<groupId>org.springframework.boot</groupId>
<artifactId>spring-boot-starter-parent</artifactId>
<version>2.3.1.RELEASE</version>
<relativePath/> <!-- lookup parent from repository -->
</parent>

上面的项目点进去可以发现他又依赖于

1
2
3
4
5
6
7
8
9
10
11
12
13
14
15
16
<parent>
<groupId>org.springframework.boot</groupId>
<artifactId>spring-boot-dependencies</artifactId>
<version>2.3.1.RELEASE</version>
</parent>

<!-- t同时约定了配置文件的名称和目录-->
<resource>
<directory>${basedir}/src/main/resources</directory>
<filtering>true</filtering>
<includes>
<include>**/application*.yml</include>
<include>**/application*.yaml</include>
<include>**/application*.properties</include>
</includes>
</resource>

这个再点进spring-boot-dependencies去可以看到一大堆默认的约定配置:

1
2
3
4
5
6
7
8
9
10
11
12
13
14
15
16
17
18
19
20
21
22

<properties>
<activemq.version>5.15.12</activemq.version>
<antlr2.version>2.7.7</antlr2.version>
<appengine-sdk.version>1.9.80</appengine-sdk.version>
<artemis.version>2.12.0</artemis.version>
<aspectj.version>1.9.5</aspectj.version>
<assertj.version>3.16.1</assertj.version>
<atomikos.version>4.0.6</atomikos.version>
<awaitility.version>4.0.3</awaitility.version>
<bitronix.version>2.1.4</bitronix.version>
<build-helper-maven-plugin.version>3.1.0</build-helper-maven-plugin.version>
<byte-buddy.version>1.10.11</byte-buddy.version>
<caffeine.version>2.8.4</caffeine.version>
<cassandra-driver.version>4.6.1</cassandra-driver.version>
<classmate.version>1.5.1</classmate.version>
<commons-codec.version>1.14</commons-codec.version>
<commons-dbcp2.version>2.7.0</commons-dbcp2.version>
<commons-lang3.version>3.10</commons-lang3.version>
<commons-pool.version>1.6</commons-pool.version>
<!-- ....... -->
<properties>

所以,我们的springboot为何能自动选择合适的版本去启动原因就在这里,父项目默认为我们选择好了合适的集成版本。之后导入项目依赖,默认是不用写版本的,除非在spring-boot-dependencies中不包含的项目。

也就是SpringBoot将常用的场景抽取出来作为starter启动器,使用组件的时候直接引用这些starter即可。

SpringbootStarter#

sprinbboot的场景启动器,如springboot-starter-web点击进去:

可以看到他依赖了一些默认的web项目所需的包:

1
2
3
4
5
6
7
8
9
10
11
12
13
14
15
16
17
18
19
20
21
22
23
24
25
26
27
28
29
30
31
32
33
34
35
36
37
38
39
<dependencies>

<dependency>
<groupId>org.springframework.boot</groupId>
<artifactId>spring-boot-starter</artifactId>
<version>2.3.1.RELEASE</version>
<scope>compile</scope>
</dependency>

<!-- boot -->
<dependency>
<groupId>org.springframework.boot</groupId>
<artifactId>spring-boot-starter-json</artifactId>
<version>2.3.1.RELEASE</version>
<scope>compile</scope>
</dependency>

<!--tomcat-->
<dependency>
<groupId>org.springframework.boot</groupId>
<artifactId>spring-boot-starter-tomcat</artifactId>
<version>2.3.1.RELEASE</version>
<scope>compile</scope>
</dependency>

<!--web,以来了beans和core-->
<dependency>
<groupId>org.springframework</groupId>
<artifactId>spring-web</artifactId>
<scope>compile</scope>
</dependency>

<!-- springMVC,里面依赖了beans、context、core、aop、expression -->
<dependency>
<groupId>org.springframework</groupId>
<artifactId>spring-webmvc</artifactId>
<scope>compile</scope>
</dependency>
</dependencies>

SpringBoot启动流程#

Spring主要关注:

  • IOC容器创建过程

  • Bean实例化过程,生命周期

  • 循环依赖解决

  • AOP

  • 事件发布和监听

SpringApplication类#

1
2
3
4
5
6
@SpringBootApplication
public class BootApplication {
public static void main(String[] args) {
SpringApplication.run(BootApplication.class);
}
}

日常我们使用上面几行看起来巨简单的代码,就一个注解 + 一行SpringApplication.run(当前类.class),通过这个run方法入口。

我们调用的SpringApplication.run先看看这个类是个啥,注释告诉我们:

  • 这是用来启动SpringApplication的一个类,默认以下步骤:
    • 根据环境不同,创建合适的ApplicationContext()
    • 注册一个CommandLinePropertySource命令行的参数解析器,来解析我们的命令行参数暴露到spring中
    • 刷新我们第一步的ApplicationContext,并创建加载所有的单例对象
    • 触发所有的CommandLineRunner
  • 这个类可以从各种来源读取bean,建议使用@Configuration类来启动我们的应用,也就是AnnotatedBeanDefinitionReader。(其他的还有XmlBeanDefinitionReader、GroovyBeanDefinitionReader)
  • ClassPathBeanDefinitionScanner会去扫描我们制定的包

我们看看这个启动流程。

背景:#

springboot有很多Listener,会发布一系列事件:

  • ApplicationStartingEvent
  • ApplicationEnvironmentPreparedEvent
  • ApplicationStartedEvent
  • ApplicationReadyEvent

Import注解的使用#

直接在Import中列举需要导入的类#

1
2
3
4
5
@Configuration
@Import({A.class, B.class})
public class XXXConfig{

}

导入ImportSelector类#

@Configuration + @Import(ImportSelectorXXXImpl.class 即可实现动态导入、动态插拔:

1
2
3
4
5
6
7
8
9
10
11
12
// 先看一个接口ImportSelector,我们一般要导入的是这个接口的实现
public interface ImportSelector {

// 返回需要导入的类名。参数importingClassMetadata给传入了注解的信息,可以根据注解信息在逻辑里面动态导入
String[] selectImports(AnnotationMetadata importingClassMetadata);

// 排除的exclude逻辑
@Nullable
default Predicate<String> getExclusionFilter() {
return null;
}
}

实现动态插拔例子

1
2
3
4
5
6
7
8
9
10
11
12
13
14
// 继承的SessionConfigurationImportSelector其实就是一个 ImportSelector,里面根据WebApplicationType返回不同的类名数组而已
class MyXXXConfigurationImportSelector extends ImportSelector {

@Override
public String[] selectImports(AnnotationMetadata importingClassMetadata) {
// 根据 importingClassMetadata里面的信息:被修饰的类名、方法名、其他注解的信息,来动态返回一个字符串数组
// 也可以去拿到BF中的bean定义、env等信息来决定返回哪些
if(xxxxx){
return new String[]{com.xxx.XXXXService, com.xxx.YYYYService};
}else{
return new String[]{com.xxx.XXXXService};
}
}
}

使用

1
2
3
4
5
6
@Configuration
@YYYConfig(yyyyy)
@Import(MyXXXConfigurationImportSelector.class) // MyXXXConfigurationImportSelector中就可以根据YYYConfig的信息、当前类的信息、BF、env信息决定导入哪些
public class XXXConfig{

}

导入ImportBeanDefinitionRegistrar#

自己手动包装一个BeanDefinition,注册到registry里面,同时给一BeanName

相当与给BF开后门,直接生成bd并注入进去,还可以修改bd信息。(用来做代理、 FactoryBean的实现等等,如mapper实现)

1
2
3
4
5
6
7
8
9
10
11
12
13
14
15
16
17
18
19
20
21
22
23
24
25
26
27
28
29
30
31
32
33
34
35
36
37
38
39
40
public interface ImportBeanDefinitionRegistrar {

/**
* Register bean definitions as necessary based on the given annotation metadata of
* the importing {@code @Configuration} class.
* <p>Note that {@link BeanDefinitionRegistryPostProcessor} types may <em>not</em> be
* registered here, due to lifecycle constraints related to {@code @Configuration}
* class processing.
* <p>The default implementation delegates to
* {@link #registerBeanDefinitions(AnnotationMetadata, BeanDefinitionRegistry)}.
* @param importingClassMetadata annotation metadata of the importing class
* @param registry current bean definition registry
* @param importBeanNameGenerator the bean name generator strategy for imported beans:
* {@link ConfigurationClassPostProcessor#IMPORT_BEAN_NAME_GENERATOR} by default, or a
* user-provided one if {@link ConfigurationClassPostProcessor#setBeanNameGenerator}
* has been set. In the latter case, the passed-in strategy will be the same used for
* component scanning in the containing application context (otherwise, the default
* component-scan naming strategy is {@link AnnotationBeanNameGenerator#INSTANCE}).
*/
// 重载注册Bean定义,有默认实现
default void registerBeanDefinitions(AnnotationMetadata importingClassMetadata, BeanDefinitionRegistry registry,
BeanNameGenerator importBeanNameGenerator) {

registerBeanDefinitions(importingClassMetadata, registry);
}

/**
* Register bean definitions as necessary based on the given annotation metadata of
* the importing {@code @Configuration} class.
* <p>Note that {@link BeanDefinitionRegistryPostProcessor} types may <em>not</em> be
* registered here, due to lifecycle constraints related to {@code @Configuration}
* class processing.
* <p>The default implementation is empty.
* @param importingClassMetadata annotation metadata of the importing class
* @param registry current bean definition registry
*/
// 注册类定义,默认为空,啥都没干,子类要实现
default void registerBeanDefinitions(AnnotationMetadata importingClassMetadata, BeanDefinitionRegistry registry) {
}
}

典型应用AOP:#

(或者Mybatis的Mapper代理生成并注入到BF也是ImportBeanDefinitionRegistrar实现的)

1
2
3
4
5
6
7
8
9
10
11
12
13
14
15
16
17
18
19
20
21
22
23
24
25
class AspectJAutoProxyRegistrar implements ImportBeanDefinitionRegistrar {

/**
* Register, escalate, and configure the AspectJ auto proxy creator based on the value
* of the @{@link EnableAspectJAutoProxy#proxyTargetClass()} attribute on the importing
* {@code @Configuration} class.
*/
// 重写了2个参数的注册方法,拿到register,自己创建RootBeanDefinition,往里面添加注册。
@Override
public void registerBeanDefinitions(
AnnotationMetadata importingClassMetadata, BeanDefinitionRegistry registry) {
// registry.registerBeanDefinition("internalAutoProxyCreator", new RootBeanDefinition(cls));
AopConfigUtils.registerAspectJAnnotationAutoProxyCreatorIfNecessary(registry);

AnnotationAttributes enableAspectJAutoProxy = AnnotationConfigUtils.attributesFor(importingClassMetadata, EnableAspectJAutoProxy.class);
if (enableAspectJAutoProxy != null) {
if (enableAspectJAutoProxy.getBoolean("proxyTargetClass")) { // 强制CGLib代理,去注册一个CGLib的
AopConfigUtils.forceAutoProxyCreatorToUseClassProxying(registry);
}
if (enableAspectJAutoProxy.getBoolean("exposeProxy")) { // 暴露ThreadLocal的AOPContext
AopConfigUtils.forceAutoProxyCreatorToExposeProxy(registry);
}
}
}
}

使用方式,再定义一个AOP注解@EnableAspectJAutoProxy来导入刚才的ImportBeanDefinitionRegistrar实现

1
2
3
4
5
6
7
8
9
10
11
12
13
14
15
16
17
18
19
20
21
22
// 导入上面的AspectJAutoProxyRegistrar
@Import(AspectJAutoProxyRegistrar.class)
public @interface EnableAspectJAutoProxy {

/**
* Indicate whether subclass-based (CGLIB) proxies are to be created as opposed
* to standard Java interface-based proxies. The default is {@code false}.
*/
// 是否强制代理,默认false
boolean proxyTargetClass() default false;

/**
* Indicate that the proxy should be exposed by the AOP framework as a {@code ThreadLocal}
* for retrieval via the {@link org.springframework.aop.framework.AopContext} class.
* Off by default, i.e. no guarantees that {@code AopContext} access will work.
* @since 4.3.1
*/
// proxy是否通过ThreadLocal暴露到AopContext中
boolean exposeProxy() default false;

}

使用,在AopAutoConfiguration这个配置类中有以下内部类:

1
2
3
4
5
6
7
8
9
10
11
12
13
14
15
16
17
18
19
   @Configuration(proxyBeanMethods = false)
@ConditionalOnClass(Advice.class)
static class AspectJAutoProxyingConfiguration {

@Configuration(proxyBeanMethods = false)
@EnableAspectJAutoProxy(proxyTargetClass = false) // 这里的false传递给了里面的BDRRegistry,会动态生成不同的Bean定义
@ConditionalOnProperty(prefix = "spring.aop", name = "proxy-target-class", havingValue = "false", matchIfMissing = false)
static class JdkDynamicAutoProxyConfiguration {
// JDK动态代理spring.aop.proxy-target-class=false的时候才会触发
}

@Configuration(proxyBeanMethods = false)
@EnableAspectJAutoProxy(proxyTargetClass = true)
@ConditionalOnProperty(prefix = "spring.aop", name = "proxy-target-class", havingValue = "true",
matchIfMissing = true)
static class CglibAutoProxyConfiguration {

}
}

启动流程#

  1. 我们main方法中的run最终调用了:new SpringApplication(primarySources).run(args)

  2. new了一个我们上面的SpringApplication类。这个new里面的操作:

    1
    2
    3
    4
    5
    6
    7
    8
    9
    10
    11
    12
    13
    14
    public SpringApplication(ResourceLoader resourceLoader, Class<?>... primarySources) {
    this.resourceLoader = resourceLoader; // null
    Assert.notNull(primarySources, "PrimarySources must not be null");
    this.primarySources = new LinkedHashSet<>(Arrays.asList(primarySources)); // 就是我们当前启动main方法的类
    this.webApplicationType = WebApplicationType.deduceFromClasspath(); // 去确认WebApplication的类型,是Servlet还是Reactive还是None
    // getSpringFactoriesInstances是核心工具方法,去加载META-INF/spring.factories所有org.springframework.context.ApplicationContextInitializer
    // 加载回来list放到当前SpringApplication中,默认7个
    setInitializers((Collection) getSpringFactoriesInstances(ApplicationContextInitializer.class));
    // 同上,加载所有jar包META-INF/spring.factories内配置的org.springframework.context.ApplicationListener (详情可以见附录),
    // 默认11个,加载回来list放到当前SpringApplication中
    setListeners((Collection) getSpringFactoriesInstances(ApplicationListener.class));
    // new了一个RuntimeException,然后去遍历堆栈,找到main方法的类,真是骚操作。。。
    this.mainApplicationClass = deduceMainApplicationClass();
    }
  3. 然后继续执行run方法:

    • public ConfigurableApplicationContext run(String... args) {
          
             //---------------------准备工作开始
      		StopWatch stopWatch = new StopWatch();  // 计时器
      		stopWatch.start();
      		ConfigurableApplicationContext context = null; // AnnotationConfigServletWebServerApplicationContext和XmlWebApplicationContext都是实现
      		Collection<SpringBootExceptionReporter> exceptionReporters = new ArrayList<>();
      		configureHeadlessProperty();  // headless解决awt
              // 使用`getSpringFactoriesInstances`工具方法从factories配置文件里面加载并创建的所有`SpringApplicationRunListener`实现。默认只有一个EventPublishingRunListener-------这个类使用来发布所有Spring应用程序事件的,里面有一系列时机去调用多拨器的发布功能。构造方法里面new了一个多拨器Multicaster,并加入配置文件里面的11个默认监听器。
      		SpringApplicationRunListeners listeners = getRunListeners(args); 
               // 迭代所有的启动listener,调用starting方法(其实就一个默认只有一个EventPublishingRunListener)它里面其实是发布了一个启动事件initialMulticaster.multicastEvent(new ApplicationStartingEvent(this.application, this.args));  然后又会去拿着这个事件信息获取所有support这个源的监听类,执行他们的listener.onApplicationEvent(event);方法。
      		listeners.starting();  
      		try {
      			ApplicationArguments applicationArguments = new DefaultApplicationArguments(args);  // 解析运行参数
      			ConfigurableEnvironment environment = prepareEnvironment(listeners, applicationArguments);  // 准备环境----见下面
      			configureIgnoreBeanInfo(environment);  // 获取env中spring.beaninfo.ignore设置到System.setProperty中
      			Banner printedBanner = printBanner(environment); // 打印banner(spring.banner.location)
                  // 根据类型创建不同的Context,这里创建了一个AnnotationConfigServletWebServerApplicationContext,塞进去AnnotatedBeanDefinitionReader和ClassPathBeanDefinitionScanner
      			context = createApplicationContext();
                  // 调用工具类读取jar包内/META-INF/spring.factories,获取所有异常报告器
      			exceptionReporters = getSpringFactoriesInstances(SpringBootExceptionReporter.class,new Class[] { ConfigurableApplicationContext.class }, context);
                  // 给上下文设置env、给Context注册参数、执行初始化器的方法、-------发布ApplicationContextInitializedEvent事件、给BeanFactory注册应用的启动参数、load方法new了一个AnnotatedBeanDefinitionReader,把启动类注册进去。--------发布ApplicationPreparedEvent事件。
      			prepareContext(context, environment, listeners, applicationArguments, printedBanner);
                  //---------------------准备工作结束,开始进入spring
                  
                  // 刷新context,调用applicationContext.refresh()进入AbstractApplicationContext的resresh方法,也就是常规spring流程------------
      			refreshContext(context);
      			afterRefresh(context, applicationArguments);
      			stopWatch.stop();
      			if (this.logStartupInfo) {
      				new StartupInfoLogger(this.mainApplicationClass).logStarted(getApplicationLog(), stopWatch);
      			}
      			listeners.started(context);
      			callRunners(context, applicationArguments);
      		}
      		catch (Throwable ex) {
      			handleRunFailure(context, ex, exceptionReporters, listeners);
      			throw new IllegalStateException(ex);
      		}
      
      		try {
      			listeners.running(context);
      		}
      		catch (Throwable ex) {
      			handleRunFailure(context, ex, exceptionReporters, null);
      			throw new IllegalStateException(ex);
      		}
      		return context;
      	}
      <!--code15-->
      
      - 先根据运行模式创建一个环境,这里是`StandardServletEnvironment`,也有相应式的`StandardReactiveWebEnvironment`
      
      - 解析启动参数到env中,启动参数解析`spring.profiles.active`选择生效的配置文件
      
      
    • 解析env中的忽略bean设置到System.property中

    • 打印banner

    • 根据类型创建不同的Context,反射创建一个AnnotationConfigServletWebServerApplicationContext

    • prepareContext准备上下文:

      • 给上下文设置env、给Context注册参数、执行初始化器的方法、发布ApplicationContextInitializedEvent事件、给BeanFactory注册应用的启动参数、load方法new了一个AnnotatedBeanDefinitionReader,把启动类注册进去。发布ApplicationPreparedEvent事件。

      • private void prepareContext(ConfigurableApplicationContext context, ConfigurableEnvironment environment,
        			SpringApplicationRunListeners listeners, ApplicationArguments applicationArguments, Banner printedBanner) {
                // 上下文设置env
        		context.setEnvironment(environment);
                // 给context设置一些属性,类型转换器ConversionService
        		postProcessApplicationContext(context);
                // 拿到所有的初始化器,执行初始化方法initializer.initialize(context);可以给context进行拓展,如给context添加BeanFactoryPostPocessor
        		applyInitializers(context);
        		listeners.contextPrepared(context);  // 发布ApplicationContextInitializedEvent事件----------------------------------第三个事件,进行一堆初始化
        		if (this.logStartupInfo) {
        			logStartupInfo(context.getParent() == null);
        			logStartupProfileInfo(context);  // 打印生效的配置文件
        		}
        		// Add boot specific singleton beans   给beanFactory注册springBoot特殊的对象
        		ConfigurableListableBeanFactory beanFactory = context.getBeanFactory();
                // 注册应用参数
        		beanFactory.registerSingleton("springApplicationArguments", applicationArguments);
        		if (printedBanner != null) {
        			beanFactory.registerSingleton("springBootBanner", printedBanner);
        		}
                // 设置是否允许BeanDefinition覆盖
        		if (beanFactory instanceof DefaultListableBeanFactory) {
        			((DefaultListableBeanFactory) beanFactory).setAllowBeanDefinitionOverriding(this.allowBeanDefinitionOverriding);
        		}
                // 添加一个懒加载的BFPP
        		if (this.lazyInitialization) {
        			context.addBeanFactoryPostProcessor(new LazyInitializationBeanFactoryPostProcessor());
        		}
        		// Load the sources
        		Set<Object> sources = getAllSources();
        		Assert.notEmpty(sources, "Sources must not be empty");
                // 重要-------------把当前启动类注册到AnnotatedBeanDefinitionReader里面。new了一个AnnotatedBeanDefinitionReader实现,调用其load方法,里面判断了isComponent。是的话就annotatedReader.register(source);source就是启动类。注册到BeanDefinitionReader中。使得我们的主启动类可以被发现。
                 // 我们的@SpringBootApplication也是继承自@Component的,所以上面isComponent才可以。
                // 后续在spring的resresh的invokeBFPP(beanFactory)中调用postProcessBeanDefinitionRegistry-->processConfigBeanDefinitions,判断对象是否是@Configuration的,是否是@Order,解析每一个用@Configuration标识的类,parse方法内-->doProcessConfigurationClass进行自动装配。
        		load(context, sources.toArray(new Object[0]));
               // 发布事件-------------------------------ApplicationPreparedEvent-----------------------------------第四个事件
        		listeners.contextLoaded(context);
         }
        <!--code16-->
        
        
  4. springboot的核心功能还是在spring里面:

    1. 自动装配在invokeBeanFactoryPostProcessor完成
    2. 后续spring中的refresh里面,finishrefresh完成tomcat启动

临时参考,自己画后干掉

image-20200714004049743

工具方法#

工具方法getSpringFactoriesInstances#

  • private <T> Collection<T> getSpringFactoriesInstances(Class<T> type, Class<?>[] parameterTypes, Object... args) 传入想获取的类型,如上面的getSpringFactoriesInstances(ApplicationContextInitializer.class)就可以获取所有META-INF/spring.factories文件中配置key为ApplicationContextInitializer的实现。
  • ClassLoader从每个jar包的META-INF/spring.factories中读取个个properties,默认的三个见附录。都是一个key,一大串value,然后放到Map缓存中。
  • 然后反射拿到各个value中的bean名称,使用构造方法创建对象list(一个key对应多个对象)。
  • 使用@Order对上面的bean进行排序,返回list。

多拨器发布事件#

SimpleApplicationEventMulticaster#multicastEvent方法用于发布启动、EnvPrepared、:

如刚开始启动的时候:initialMulticaster.multicastEvent(new ApplicationStartingEvent(this.application, this.args)) 发布了一个启动方法

1
2
3
4
5
6
7
8
9
10
11
12
13
public void multicastEvent(final ApplicationEvent event, @Nullable ResolvableType eventType) {
ResolvableType type = (eventType != null ? eventType : resolveDefaultEventType(event));
Executor executor = getTaskExecutor();
// getApplicationListeners拿到event和一个resolvableType去拿所有支持这个事件的listener,底层是用event的时间源source类名去各个listener中判断当前listener是否supportEvents支持这个event源,支持的话才能拿到。
for (ApplicationListener<?> listener : getApplicationListeners(event, type)) {
if (executor != null) {
executor.execute(() -> invokeListener(listener, event));
}
else {
invokeListener(listener, event); // 执行所有的listener.onApplicationEvent(event);
}
}
}
  • public SpringApplication(ResourceLoader resourceLoader, Class<?>… primarySources) ,resourceLoader是null,primarySources是当前启动main类
  • webApplicationType = WebApplicationType.deduceFromClasspath(); 去决定我们的

new 的时候完成了prepare

环境准备好之后,发布environmentPreparedEvent,然后发布事件,listener挨个执行。

创建上下文对象AnnotationConfigServletWebServerApplicationContext

  • prepareContext:#

附录#

org.springframework.context.ApplicationContextInitializerorg.springframework.context.ApplicationListener 在启动并new SpringApplication的时候加载

spring-boot-2.3.1.RELEASE.jar # META-INF/spring.factories#

spring-boot-2.3.1.RELEASE.jar中的spring.factories文件参考:

  • 里面有个8个key,功能如下:
1
2
3
4
5
6
7
8
9
10
11
12
13
14
15
16
17
18
19
20
21
22
23
24
25
26
27
28
29
30
31
32
33
34
35
36
37
38
39
40
41
42
43
44
45
46
47
48
49
50
51
52
53
54
55
56
57
58
59
60
61
# PropertySource Loaders-----------加载properties或者yaml配置文件的
org.springframework.boot.env.PropertySourceLoader=\
org.springframework.boot.env.PropertiesPropertySourceLoader,\
org.springframework.boot.env.YamlPropertySourceLoader

# Run Listeners------------启动的监听器,用于事件发布
org.springframework.boot.SpringApplicationRunListener=\
org.springframework.boot.context.event.EventPublishingRunListener

# Error Reporters----------------异常报告器
org.springframework.boot.SpringBootExceptionReporter=\
org.springframework.boot.diagnostics.FailureAnalyzers

# Application Context Initializers----------------初始化器
org.springframework.context.ApplicationContextInitializer=\
org.springframework.boot.context.ConfigurationWarningsApplicationContextInitializer,\
org.springframework.boot.context.ContextIdApplicationContextInitializer,\
org.springframework.boot.context.config.DelegatingApplicationContextInitializer,\
org.springframework.boot.rsocket.context.RSocketPortInfoApplicationContextInitializer,\
org.springframework.boot.web.context.ServerPortInfoApplicationContextInitializer

# Application Listeners-----------------监听器列表,文件编码、配置文件、日志
org.springframework.context.ApplicationListener=\
org.springframework.boot.ClearCachesApplicationListener,\
org.springframework.boot.builder.ParentContextCloserApplicationListener,\
org.springframework.boot.cloud.CloudFoundryVcapEnvironmentPostProcessor,\
org.springframework.boot.context.FileEncodingApplicationListener,\
org.springframework.boot.context.config.AnsiOutputApplicationListener,\
org.springframework.boot.context.config.ConfigFileApplicationListener,\
org.springframework.boot.context.config.DelegatingApplicationListener,\
org.springframework.boot.context.logging.ClasspathLoggingApplicationListener,\
org.springframework.boot.context.logging.LoggingApplicationListener,\
org.springframework.boot.liquibase.LiquibaseServiceLocatorApplicationListener

# Environment Post Processors---------------环境处理processor,json环境、等等
org.springframework.boot.env.EnvironmentPostProcessor=\
org.springframework.boot.cloud.CloudFoundryVcapEnvironmentPostProcessor,\
org.springframework.boot.env.SpringApplicationJsonEnvironmentPostProcessor,\
org.springframework.boot.env.SystemEnvironmentPropertySourceEnvironmentPostProcessor,\
org.springframework.boot.reactor.DebugAgentEnvironmentPostProcessor

# Failure Analyzers----------------各种异常的失败解析器
org.springframework.boot.diagnostics.FailureAnalyzer=\
org.springframework.boot.diagnostics.analyzer.BeanCurrentlyInCreationFailureAnalyzer,\
org.springframework.boot.diagnostics.analyzer.BeanDefinitionOverrideFailureAnalyzer,\
org.springframework.boot.diagnostics.analyzer.BeanNotOfRequiredTypeFailureAnalyzer,\
org.springframework.boot.diagnostics.analyzer.BindFailureAnalyzer,\
org.springframework.boot.diagnostics.analyzer.BindValidationFailureAnalyzer,\
org.springframework.boot.diagnostics.analyzer.UnboundConfigurationPropertyFailureAnalyzer,\
org.springframework.boot.diagnostics.analyzer.ConnectorStartFailureAnalyzer,\
org.springframework.boot.diagnostics.analyzer.NoSuchMethodFailureAnalyzer,\
org.springframework.boot.diagnostics.analyzer.NoUniqueBeanDefinitionFailureAnalyzer,\
org.springframework.boot.diagnostics.analyzer.PortInUseFailureAnalyzer,\
org.springframework.boot.diagnostics.analyzer.ValidationExceptionFailureAnalyzer,\
org.springframework.boot.diagnostics.analyzer.InvalidConfigurationPropertyNameFailureAnalyzer,\
org.springframework.boot.diagnostics.analyzer.InvalidConfigurationPropertyValueFailureAnalyzer

# FailureAnalysisReporters-----------------异常失败分析报告器
org.springframework.boot.diagnostics.FailureAnalysisReporter=\
org.springframework.boot.diagnostics.LoggingFailureAnalysisReporter

spring-boot-autoconfigure-2.3.1.RELEASE.jar#spring.factories#

内容和功能如下:

1
2
3
4
5
6
7
8
9
10
11
12
13
14
15
16
17
18
19
20
21
22
23
24
25
26
27
28
29
30
31
32
33
34
35
36
37
38
39
40
41
42
43
44
45
46
47
48
49
50
51
52
53
54
55
56
57
58
59
60
61
62
63
64
65
66
67
68
69
70
71
72
73
74
75
76
77
78
79
80
81
82
83
84
85
86
87
88
89
90
91
92
93
94
95
96
97
98
99
100
101
102
103
104
105
106
107
108
109
110
111
112
113
114
115
116
117
118
119
120
121
122
123
124
125
126
127
128
129
130
131
132
133
134
135
136
137
138
139
140
141
142
143
144
145
146
147
148
149
150
151
152
153
154
155
156
157
158
159
160
161
162
163
164
165
166
# Initializers----------初始化器
org.springframework.context.ApplicationContextInitializer=\
org.springframework.boot.autoconfigure.SharedMetadataReaderFactoryContextInitializer,\
org.springframework.boot.autoconfigure.logging.ConditionEvaluationReportLoggingListener

# Application Listeners----------------后台预初始化器
org.springframework.context.ApplicationListener=\
org.springframework.boot.autoconfigure.BackgroundPreinitializer

# Auto Configuration Import Listeners-----------------------自动配置的ImportListener
org.springframework.boot.autoconfigure.AutoConfigurationImportListener=\
org.springframework.boot.autoconfigure.condition.ConditionEvaluationReportAutoConfigurationImportListener

# Auto Configuration Import Filters------------------------自动配置的ImportFilter条件
org.springframework.boot.autoconfigure.AutoConfigurationImportFilter=\
org.springframework.boot.autoconfigure.condition.OnBeanCondition,\
org.springframework.boot.autoconfigure.condition.OnClassCondition,\
org.springframework.boot.autoconfigure.condition.OnWebApplicationCondition

# Auto Configure-----------------自动配置的核心类EnableAutoConfiguration,可以看到里面集成了ES、JPA、Mongo、Neo4j、Redis、MQ等等
org.springframework.boot.autoconfigure.EnableAutoConfiguration=\
org.springframework.boot.autoconfigure.admin.SpringApplicationAdminJmxAutoConfiguration,\
org.springframework.boot.autoconfigure.aop.AopAutoConfiguration,\
org.springframework.boot.autoconfigure.amqp.RabbitAutoConfiguration,\
org.springframework.boot.autoconfigure.batch.BatchAutoConfiguration,\
org.springframework.boot.autoconfigure.cache.CacheAutoConfiguration,\
org.springframework.boot.autoconfigure.cassandra.CassandraAutoConfiguration,\
org.springframework.boot.autoconfigure.context.ConfigurationPropertiesAutoConfiguration,\
org.springframework.boot.autoconfigure.context.LifecycleAutoConfiguration,\
org.springframework.boot.autoconfigure.context.MessageSourceAutoConfiguration,\
org.springframework.boot.autoconfigure.context.PropertyPlaceholderAutoConfiguration,\
org.springframework.boot.autoconfigure.couchbase.CouchbaseAutoConfiguration,\
org.springframework.boot.autoconfigure.dao.PersistenceExceptionTranslationAutoConfiguration,\
org.springframework.boot.autoconfigure.data.cassandra.CassandraDataAutoConfiguration,\
org.springframework.boot.autoconfigure.data.cassandra.CassandraReactiveDataAutoConfiguration,\
org.springframework.boot.autoconfigure.data.cassandra.CassandraReactiveRepositoriesAutoConfiguration,\
org.springframework.boot.autoconfigure.data.cassandra.CassandraRepositoriesAutoConfiguration,\
org.springframework.boot.autoconfigure.data.couchbase.CouchbaseDataAutoConfiguration,\
org.springframework.boot.autoconfigure.data.couchbase.CouchbaseReactiveDataAutoConfiguration,\
org.springframework.boot.autoconfigure.data.couchbase.CouchbaseReactiveRepositoriesAutoConfiguration,\
org.springframework.boot.autoconfigure.data.couchbase.CouchbaseRepositoriesAutoConfiguration,\
org.springframework.boot.autoconfigure.data.elasticsearch.ElasticsearchDataAutoConfiguration,\
org.springframework.boot.autoconfigure.data.elasticsearch.ElasticsearchRepositoriesAutoConfiguration,\
org.springframework.boot.autoconfigure.data.elasticsearch.ReactiveElasticsearchRepositoriesAutoConfiguration,\
org.springframework.boot.autoconfigure.data.elasticsearch.ReactiveElasticsearchRestClientAutoConfiguration,\
org.springframework.boot.autoconfigure.data.jdbc.JdbcRepositoriesAutoConfiguration,\
org.springframework.boot.autoconfigure.data.jpa.JpaRepositoriesAutoConfiguration,\
org.springframework.boot.autoconfigure.data.ldap.LdapRepositoriesAutoConfiguration,\
org.springframework.boot.autoconfigure.data.mongo.MongoDataAutoConfiguration,\
org.springframework.boot.autoconfigure.data.mongo.MongoReactiveDataAutoConfiguration,\
org.springframework.boot.autoconfigure.data.mongo.MongoReactiveRepositoriesAutoConfiguration,\
org.springframework.boot.autoconfigure.data.mongo.MongoRepositoriesAutoConfiguration,\
org.springframework.boot.autoconfigure.data.neo4j.Neo4jDataAutoConfiguration,\
org.springframework.boot.autoconfigure.data.neo4j.Neo4jRepositoriesAutoConfiguration,\
org.springframework.boot.autoconfigure.data.solr.SolrRepositoriesAutoConfiguration,\
org.springframework.boot.autoconfigure.data.r2dbc.R2dbcDataAutoConfiguration,\
org.springframework.boot.autoconfigure.data.r2dbc.R2dbcRepositoriesAutoConfiguration,\
org.springframework.boot.autoconfigure.data.r2dbc.R2dbcTransactionManagerAutoConfiguration,\
org.springframework.boot.autoconfigure.data.redis.RedisAutoConfiguration,\
org.springframework.boot.autoconfigure.data.redis.RedisReactiveAutoConfiguration,\
org.springframework.boot.autoconfigure.data.redis.RedisRepositoriesAutoConfiguration,\
org.springframework.boot.autoconfigure.data.rest.RepositoryRestMvcAutoConfiguration,\
org.springframework.boot.autoconfigure.data.web.SpringDataWebAutoConfiguration,\
org.springframework.boot.autoconfigure.elasticsearch.ElasticsearchRestClientAutoConfiguration,\
org.springframework.boot.autoconfigure.flyway.FlywayAutoConfiguration,\
org.springframework.boot.autoconfigure.freemarker.FreeMarkerAutoConfiguration,\
org.springframework.boot.autoconfigure.groovy.template.GroovyTemplateAutoConfiguration,\
org.springframework.boot.autoconfigure.gson.GsonAutoConfiguration,\
org.springframework.boot.autoconfigure.h2.H2ConsoleAutoConfiguration,\
org.springframework.boot.autoconfigure.hateoas.HypermediaAutoConfiguration,\
org.springframework.boot.autoconfigure.hazelcast.HazelcastAutoConfiguration,\
org.springframework.boot.autoconfigure.hazelcast.HazelcastJpaDependencyAutoConfiguration,\
org.springframework.boot.autoconfigure.http.HttpMessageConvertersAutoConfiguration,\
org.springframework.boot.autoconfigure.http.codec.CodecsAutoConfiguration,\
org.springframework.boot.autoconfigure.influx.InfluxDbAutoConfiguration,\
org.springframework.boot.autoconfigure.info.ProjectInfoAutoConfiguration,\
org.springframework.boot.autoconfigure.integration.IntegrationAutoConfiguration,\
org.springframework.boot.autoconfigure.jackson.JacksonAutoConfiguration,\
org.springframework.boot.autoconfigure.jdbc.DataSourceAutoConfiguration,\
org.springframework.boot.autoconfigure.jdbc.JdbcTemplateAutoConfiguration,\
org.springframework.boot.autoconfigure.jdbc.JndiDataSourceAutoConfiguration,\
org.springframework.boot.autoconfigure.jdbc.XADataSourceAutoConfiguration,\
org.springframework.boot.autoconfigure.jdbc.DataSourceTransactionManagerAutoConfiguration,\
org.springframework.boot.autoconfigure.jms.JmsAutoConfiguration,\
org.springframework.boot.autoconfigure.jmx.JmxAutoConfiguration,\
org.springframework.boot.autoconfigure.jms.JndiConnectionFactoryAutoConfiguration,\
org.springframework.boot.autoconfigure.jms.activemq.ActiveMQAutoConfiguration,\
org.springframework.boot.autoconfigure.jms.artemis.ArtemisAutoConfiguration,\
org.springframework.boot.autoconfigure.jersey.JerseyAutoConfiguration,\
org.springframework.boot.autoconfigure.jooq.JooqAutoConfiguration,\
org.springframework.boot.autoconfigure.jsonb.JsonbAutoConfiguration,\
org.springframework.boot.autoconfigure.kafka.KafkaAutoConfiguration,\
org.springframework.boot.autoconfigure.availability.ApplicationAvailabilityAutoConfiguration,\
org.springframework.boot.autoconfigure.ldap.embedded.EmbeddedLdapAutoConfiguration,\
org.springframework.boot.autoconfigure.ldap.LdapAutoConfiguration,\
org.springframework.boot.autoconfigure.liquibase.LiquibaseAutoConfiguration,\
org.springframework.boot.autoconfigure.mail.MailSenderAutoConfiguration,\
org.springframework.boot.autoconfigure.mail.MailSenderValidatorAutoConfiguration,\
org.springframework.boot.autoconfigure.mongo.embedded.EmbeddedMongoAutoConfiguration,\
org.springframework.boot.autoconfigure.mongo.MongoAutoConfiguration,\
org.springframework.boot.autoconfigure.mongo.MongoReactiveAutoConfiguration,\
org.springframework.boot.autoconfigure.mustache.MustacheAutoConfiguration,\
org.springframework.boot.autoconfigure.orm.jpa.HibernateJpaAutoConfiguration,\
org.springframework.boot.autoconfigure.quartz.QuartzAutoConfiguration,\
org.springframework.boot.autoconfigure.r2dbc.R2dbcAutoConfiguration,\
org.springframework.boot.autoconfigure.rsocket.RSocketMessagingAutoConfiguration,\
org.springframework.boot.autoconfigure.rsocket.RSocketRequesterAutoConfiguration,\
org.springframework.boot.autoconfigure.rsocket.RSocketServerAutoConfiguration,\
org.springframework.boot.autoconfigure.rsocket.RSocketStrategiesAutoConfiguration,\
org.springframework.boot.autoconfigure.security.servlet.SecurityAutoConfiguration,\
org.springframework.boot.autoconfigure.security.servlet.UserDetailsServiceAutoConfiguration,\
org.springframework.boot.autoconfigure.security.servlet.SecurityFilterAutoConfiguration,\
org.springframework.boot.autoconfigure.security.reactive.ReactiveSecurityAutoConfiguration,\
org.springframework.boot.autoconfigure.security.reactive.ReactiveUserDetailsServiceAutoConfiguration,\
org.springframework.boot.autoconfigure.security.rsocket.RSocketSecurityAutoConfiguration,\
org.springframework.boot.autoconfigure.security.saml2.Saml2RelyingPartyAutoConfiguration,\
org.springframework.boot.autoconfigure.sendgrid.SendGridAutoConfiguration,\
org.springframework.boot.autoconfigure.session.SessionAutoConfiguration,\
org.springframework.boot.autoconfigure.security.oauth2.client.servlet.OAuth2ClientAutoConfiguration,\
org.springframework.boot.autoconfigure.security.oauth2.client.reactive.ReactiveOAuth2ClientAutoConfiguration,\
org.springframework.boot.autoconfigure.security.oauth2.resource.servlet.OAuth2ResourceServerAutoConfiguration,\
org.springframework.boot.autoconfigure.security.oauth2.resource.reactive.ReactiveOAuth2ResourceServerAutoConfiguration,\
org.springframework.boot.autoconfigure.solr.SolrAutoConfiguration,\
org.springframework.boot.autoconfigure.task.TaskExecutionAutoConfiguration,\
org.springframework.boot.autoconfigure.task.TaskSchedulingAutoConfiguration,\
org.springframework.boot.autoconfigure.thymeleaf.ThymeleafAutoConfiguration,\
org.springframework.boot.autoconfigure.transaction.TransactionAutoConfiguration,\
org.springframework.boot.autoconfigure.transaction.jta.JtaAutoConfiguration,\
org.springframework.boot.autoconfigure.validation.ValidationAutoConfiguration,\
org.springframework.boot.autoconfigure.web.client.RestTemplateAutoConfiguration,\
org.springframework.boot.autoconfigure.web.embedded.EmbeddedWebServerFactoryCustomizerAutoConfiguration,\
org.springframework.boot.autoconfigure.web.reactive.HttpHandlerAutoConfiguration,\
org.springframework.boot.autoconfigure.web.reactive.ReactiveWebServerFactoryAutoConfiguration,\
org.springframework.boot.autoconfigure.web.reactive.WebFluxAutoConfiguration,\
org.springframework.boot.autoconfigure.web.reactive.error.ErrorWebFluxAutoConfiguration,\
org.springframework.boot.autoconfigure.web.reactive.function.client.ClientHttpConnectorAutoConfiguration,\
org.springframework.boot.autoconfigure.web.reactive.function.client.WebClientAutoConfiguration,\
org.springframework.boot.autoconfigure.web.servlet.DispatcherServletAutoConfiguration,\
org.springframework.boot.autoconfigure.web.servlet.ServletWebServerFactoryAutoConfiguration,\
org.springframework.boot.autoconfigure.web.servlet.error.ErrorMvcAutoConfiguration,\
org.springframework.boot.autoconfigure.web.servlet.HttpEncodingAutoConfiguration,\
org.springframework.boot.autoconfigure.web.servlet.MultipartAutoConfiguration,\
org.springframework.boot.autoconfigure.web.servlet.WebMvcAutoConfiguration,\
org.springframework.boot.autoconfigure.websocket.reactive.WebSocketReactiveAutoConfiguration,\
org.springframework.boot.autoconfigure.websocket.servlet.WebSocketServletAutoConfiguration,\
org.springframework.boot.autoconfigure.websocket.servlet.WebSocketMessagingAutoConfiguration,\
org.springframework.boot.autoconfigure.webservices.WebServicesAutoConfiguration,\
org.springframework.boot.autoconfigure.webservices.client.WebServiceTemplateAutoConfiguration

# Failure analyzers----------------异常失败解析器
org.springframework.boot.diagnostics.FailureAnalyzer=\
org.springframework.boot.autoconfigure.diagnostics.analyzer.NoSuchBeanDefinitionFailureAnalyzer,\
org.springframework.boot.autoconfigure.flyway.FlywayMigrationScriptMissingFailureAnalyzer,\
org.springframework.boot.autoconfigure.jdbc.DataSourceBeanCreationFailureAnalyzer,\
org.springframework.boot.autoconfigure.jdbc.HikariDriverConfigurationFailureAnalyzer,\
org.springframework.boot.autoconfigure.r2dbc.ConnectionFactoryBeanCreationFailureAnalyzer,\
org.springframework.boot.autoconfigure.session.NonUniqueSessionRepositoryFailureAnalyzer

# Template availability providers-------------------模板引擎支持
org.springframework.boot.autoconfigure.template.TemplateAvailabilityProvider=\
org.springframework.boot.autoconfigure.freemarker.FreeMarkerTemplateAvailabilityProvider,\
org.springframework.boot.autoconfigure.mustache.MustacheTemplateAvailabilityProvider,\
org.springframework.boot.autoconfigure.groovy.template.GroovyTemplateAvailabilityProvider,\
org.springframework.boot.autoconfigure.thymeleaf.ThymeleafTemplateAvailabilityProvider,\
org.springframework.boot.autoconfigure.web.servlet.JspTemplateAvailabilityProvider

spring-beans-5.2.7.RELEASE.jar#spring.factories#

1
org.springframework.beans.BeanInfoFactory=org.springframework.beans.ExtendedBeanInfoFactory

SpringBoot自动装配原理#

首先,一句话描述“在BeanFactoryPostProcessor中完成的。”具体来说:

启动过程:#

  • 住启动类里面的run方法,底层new了一个SpringApplicatin,执行他的run方法。
    • new这个SpringApplicatin这个过程会推断我们的运行环境,是Sevlet、还是Groovy、还是Reactive
    • 解析/META-INF/spring.factories,从这个文件里面加载初始化器、加载ApplicationListener,放到当前的对象里。
    • 推断主启动类,new了一个RuntimeException,找到堆栈中main的那个类
  • 继续执行run方法:
    • 启动一个计时器stopWatch,配置headless
    • /META-INF/spring.factories找到一个SpringRunListener的实现,默认是EventPublishListenr,创建他,并在他里面塞了一个多拨器。多拨器里面是上面的一堆listener。
      • 发布第一个事件:ApplicationStartingEvent
        • 有一个BackgrougPreInitListener判断多核就启动一个后台线程去执行初始化(jackson、conversion、messegeConvert)。
        • DelegatingApplicatoinListener转发事件到用户的listener中去,此时为空。
    • 准备系统环境参数prepareEnvironment:将请求参数封装,拿出来系统参数、serlvet-init param封装、获取active-profiles,发布EnvironmentPreparedEvent
      • ConfigFileApplicationListener从env拿到active-profiles,读取配置文件
      • LoggingApplicationListenerenv拿到参数,设置日志文件、等级
      • DelegatingApplicationListener—解析配置文件**context.listener.classes**参数的类名,把用户实现了ApplicationListener的类都拿出来。
    • 打印banner
    • **创建上下文createApplicationContext:**既然是创建,先要知道类型。根据构造方法里面的运行环境是servlet,new了一个AnnocationConfigSevletWebServerApplicationContext对象,反射创建,作为我们的核心context对象。构造方法里:
      • 创建了DefaultListableBeanFactory,new了两个核心对象塞进去:
        • AnnotatedBeanDefinitionReader(this)传入当前context作为BeanDefinitionRegistry注册中心。里面创建并注册了核心的Annocation PostProcessor的BeanDefinition
          • ConfigurationClassPostProcessor:后续自动装配的核心类
          • AutowiredAnnotationBeanPostProcessor:后续IOC注入的一个核心类
        • ClassPathBeanDefinitionScanner(this)同样传入context、env、resourceLoader
    • 准备上下文prepareContext(context, environment, listeners, applicationArguments, printedBanner)
      • postProcessingContext(ctx):给BF塞进去一堆conversionService(数字、字符、日期转换服务)
      • applyInitializers:应用所有的初始化器:
        • DelegatingApplicationContextInitializer:又是一个委托代理,把配置文件的context.initializer.classes解析出来实例化,执行,默认空的。
      • 发布ApplicationContextInitializedEvent事件,同样由EventPublishingRunListener使用多拨器发布事件:
        • DelegatingApplicationListener:转发请求到用户自定义的listener中去
      • load方法:加载资源、识别注解,使得当前启动类是可以被识别到:
        • 创建BeanDefinitionLoader,里面塞了AnnotatedBeanDefinitionReader(registry)
        • 进入重载的load(启动类)方法,判断isComponent(启动类),当前启动类的继承接口中是否@Component修饰(必然是,因为@Configuration是):
          • 去给启动类创建一个Definitio(解析了@Lazy、@Primary、@DependsOn),然后把启动类的definition注册到context中去
          • 把启动类注册到annocationReader中去------把我们的主启动类让Spring注解能扫描到
    • 发布ApplicationPreparedEvent事件
      • DelegatingApplicacationListener转发给用户自定义listener
      • 其他的没啥了,PrepareContext的事件业务,实现类大多都在上一步的ApplicationContextInitializedEvent做了
    • 刷新上下文application.refreshContext(context)
      super.refresh()中调用了**ConfigurableApplicationContext#refresh()**进入AbstractApplicationContext.refresh()方法,也就是经典springframework流程。

下面就开始真正的refresh()过程,分割一下更清晰:

  • prepareRefresh():没啥用,设置启动时间、启动停止标志位

  • obtainFreshBeanFactory():直接拿到DefaultListableBeanFactory,经典springframework此处是new的

  • prepareBeanFactory(BF)

    • 给BF设置参数,BF里面注册env,
    • 添加一个BPP:ApplicationContextAwareProcessor,处理各种Aware,后续创建Bean的时候可以根据Bean实现的Aware的类型塞进去context、env、ApplicationEventPublisher等。
    • BF添加一个BPP:ApplicationListenerDetector,用来识别所有的ApplicationListener
  • **postProcessBeanFactory(BF)**给BF设置参数、初始化SCOPE、初始化Ruquest、Response、Session各自的ObjectFactory

  • invokeBeanFactoryPostProcessors(BF)实例化并执行所有已经注册的BFPP,有顺序的话按照顺序执行,自动装配在此实现

    • **PostProcessorRegistrationDelegate.invokeBeanFactoryPostProcessors(BF, getBeanFactoryPostProcessors());**熟悉的委托思想,里面的逻辑几块都是重复的:

      • 从BF中拿出所有的BFPP,然后将子类BDRPP放到一个list中,BPP放到一个list中

      • 依次先找@PriorityOrdered、再@Ordered、再others去寻找BeanDefinitionRegistryPostProcessorBeanFactoryPostProcessor,创建、排序后执行。

      • 1)先执行子类invokeBeanDefinitionRegistryPostProcessors(currentRegistryProcessors, registry):

        • 其中最终要的:ConfigurationClassPostProcessor#postProcessBeanDefinitionRegistry(BF)核心方法,实现了自动装配:

          • **processConfigBeanDefinitions()**方法做了:

            • 拿出BF所有的类定义,找到@Configuration修饰的(此时默认只有启动类)

            • new ConfigurationClassParser().parse(ConfigurationBeanNames):参数也只有启动类。

              • parse方法进入一个核心干活的**ClassPathBeanDefinitionScanner#doScan**会去扫描子包,解析所有子包的@Component的类,判断Scope、生成BeanName、设置AutoWire类型initMethodNamedestroyMethodName、解析@Lazy@Primary@DependsOn然后生成一个Set<BeanDefinitionHolder>类定义。

              • 同时记录下了所有的@Configuration类

              • 上面parsedoScan扫描完毕后,会拿到2个默认的@Import类就是我们启动类配置文件上面的。使用processImports方法处理@Import,完成自动装配。准备工作:

                • 循环Set<BeanDefinitionHolder>(扫描来的每个类定义),检查是否配置类,检查逻辑:
                • @Configuration,且类定义元数据中的proxyBeanMethods不存在,设置类定义的configurationClass=full,返回true。
                • 是 @Configuration且有proxyBeanMethods、或者非@Configuration的@Import、@Component、@ImportResource、@ComponentScan,设置类定义的configurationClass=lite。塞进去order,返回true
                • 其他普通类返回false
                • 对上面每个确认通过的(可能的)配置类调用parse(className,beanName),又递归调用processConfigurationClass递归分类处理。
              • ConfigurationClassParser#processImports方法,核心中的核心:

                • 判断循环import报错
                • importStack(配置类)入栈
                • 循环判断需要导入的类的类型:
                  • [第一种] 判断是ImportSelector的子类,默认也就是启动类的 @EnableAutoConfiguration里面的@Import(AutoConfigurationImportSelector.class) ,又分两种情况:

                    - ① 用户自定义的`ImportSelector` 先执行:
                          - `selector.selectImports(MetaData)`拿到用户要导入的类的class名称列表,包装为sourceClass的列表。(返回的class是啥,bd就是啥,是死的)
                         - **递归调用`processImports(sourceClass列表)`继续解析**
                        -  ② spring内置的`DeferredImportSelector`的子类,如`AutoConfigurationImportSelector`会延迟到普通`ImportSelector`之后运行:
                      - 加载`AutoConfigurationImportSelector`类并实例化selector
                      - **deferredImportSelectorHandler.handle(启动类Class、selector)完成自动装配,下面是细节-----递归,也会出入栈**
                        - 又创建了一个**DeferredImportSelectorGroupingHandler**,处理过程见下面。
                        - 先`register`,把导入的类放到`configurationClasses`list中
                        - 再`processGroupImports`,去执行类似`selector.selectImports(MetaData)`拿到类列表
                           - **递归调用`processImports(sourceClass列表)`继续解析**
                    
                    • [第二种] 判断是 ImportBeanDefinitionRegistrar的实现类:
                      • 反射创建,对象视为ImportBeanDefinitionRegistrar,给当前配置类configClass里面add一个创建的registrar,最后在外面统一进行注册。(可以动态生成class,动态创建bd,非常灵活。Mybatis的Mapper就是这样的)
                        • 如是启动类的 @Import(AutoConfigurationPackages.Registrar.class)判断是ImportBeanDefinitionRegistrar的子类:
                        • 实例化一个AutoConfigurationPackages.Registrar对象,塞进去BF、env、resourceLoader
                          - importBeanDefinitionRegistrars.put(registrar, 启动类MetaData)放进去这个对象
                    • [第三种] import普通类,视为普通@Configuration,进行processConfigurationClass(clz,filter)调用
                  • 上面三种情况处理的结果都放到configClass这个list中

          • importStack(配置类)出栈
            - 最后调用deferredImportSelectorHandler.process()去处理所有的import

            - **`ConfigurationClassParser$DeferredImportSelectorHandler#handle(configClass,selector)`处理`DeferredImportSelector`:----------递归逻辑**
                    - 大体是解析`META-INF/spring.factories`中的自动配置类,筛选满足Condition的对象`deferredImportSelectorHandler.process()`:
                            - `handler`的`deferredImportSelectors`对象里面有上面启动类`@EnableAutoConfiguration`上面的 `@AutoConfigurationImportSelector`对象(env,BF),多个的话是list,排序。
                         - **handler.processGroupImports()**,执行分组导入,先执行grouping.getImports()方法去真正获取配置类:
                         - **grouping.getImports()**会调用到`group.select()`会进入到**`AutoConfigurationImportSelector#process(annoMetaData, selector)`**方法。
                        - 最后落地调用了**`AutoConfigurationImportSelector#getAutoConfigurationEntry(annocationMetaData)`**方法去加载配置文件:**`SpringFactoriesLoader.loadFactoryNames(EnableAutoConfiguration.class)`**去拿到`META-INF/spring.factories`里面所有的`EnableAutoConfiguration`自动配置类。(springboot2默认拿出来124个所有的自动装配类)
                         - 处理`@ConditionOnBean、@ConditionOnMissingBean、@OnWebApplicationCondition`,删掉不符合的,剩下的就是有效的自动装配类(默认29个)
            
            • 最后**Selector.selectImports()**,筛选我们配置文件上配置的exclude排除的配置类。(默认没有)

          然后grouping.getImports().forEach(eachAotuConfiduration->{processImports(启动类,当前配置AnnotationMetaData)})-----开始递归一次解析当前自动装配类:
          importStack入栈--->processConfigurationClass--->doProcessConfigurationClass(解析@Component和递归内嵌方法@Configuration)--->importStack出栈

            后面依次再来上面的流程。
          

        上面子类BeanDefinitionRegistryPostProcessor流程走完之后,所有的配置类的BeanDefinition就被加载到BeanFactory中了。接下来开始执行各种父类的BeanFactoryPostProcessor去插手BeanFactory创建。

    • 2)再把子类当作普通BeanFactoryPostProcessor执行一遍类invokeBeanFactoryPostProcessors(registryProcessors, beanFactory);

      • 又到了我们上面的CinfigurationClassPostProcessor类的postProcessBeanFactory,这里面干了两件事:
      • CGLib代理我们的@Configuration类、给BF添加一个ImportAwareBeanPostProcessor
        • enhanceConfigurationClasses(beanFactory):这一行代码遍历所有的类定义,判断是否full还是lite,full的使用CGlib的Enhancer进行增强创建代理,新增了一个接口EnhancerConfiguration,其实是一个BeanFactoryAware并给代理类创建了一个public 的 $$beanFactory属性用来存放BF。同时传入一个MethodInterceptor,来拦截方法调用,防止因为@Bean方法的互相调用来导致多次new对象。(在拦截器里面有判断是否初次调用,不是的话就new,否则从$$beanFactory拿出来一个引用。判断是根据代理方法名和调用方法名是否一致),具体见 《关于代理的一切》里面有CGlib那一块,摘录了spring此处的实现。
        • beanFactory.addBeanPostProcessor(new ImportAwareBeanPostProcessor(beanFactory))给BF手动添加一个BPP。
    • **3)**再执行普通的父类BeanFactoryPostProcessor,也是按照@PriorityOrderd@Orderednone普通的顺序执行BFPP(都不太重要):invokeBeanFactoryPostProcessors(regularPostProcessors, beanFactory);

      • PropertySourceOrderingPostProcessor,调用postProcessBeanFactory,里面给environment.getPropertySources()的defaultProperties重新排序到最后,没啥意思。
      • ErrorMvcAutoConfiguration$$PreserveErrorControllerTargetClassPostProcessor#postProcessBeanFactory(BF): 从BF拿出ErrorController的实现类,设置必须Aop代理
      • EventListenerMethodProcessor#postProcessBeanFactory(BF):拿出EventListenerFactory.class的bean设置到自己中。(EventListenerMethodProcessor还是一个SmartInitializingSingleton的实现,在afterSingletonsInstantiated回调中),这里面有一个TransactionalEventListenerFactory
  • registerBeanPostProcessors(beanFactory): 对BPP进行注册

    • 进入的时候已经有了之前程序塞的4个BPP:
      ApplicationContextAwareProcessor、ApplicatonListnerDetector、WebApplicationContextSevletContextAwareProcessor、ConfigurationClassPostProcessor的内部类ImportAwareBeanPostProcessor(4个)
      然后:
      BF.getBeanNamesForType(BeanPostProcessor.class); 拿到所有的BPP给BF添加一个BeanPostProcessorChecker去校和打印信息,当BeanPostProcessor创建的时候bean就创建了,或者BPP处理bean有错误不合格。(5个)

      类似BFPP,也是先注册@PriorityOrdered BPP,再注册@Ordered,最后是其他的。另外如果BPP是MergedBeanDefinitionPostProcessor类型,收集到一个internalPostProcessors中排序后注册到BF。

核心配置主启动类 @SpringBootApplication#

标明这是一个主启动类,是一个聚合注解,会同时触发@Configuration @EnableAutoConfiguration@ComponentScan,参数有

  • exclude/excludeName要排除的自动装配的类/类名数组,从@EnableAutoConfiguration继承而来
  • scanBasePackages/scanBasePackageClasses要扫描@Components的包和类集合
  • nameGenerator:beanName生成器
1
2
3
4
5
6
7
8
9
10
11
12
13
14
15
16
17
18
19
20
21
22
23
24
25
26
27
28
29
30
31
32
33
34
35
36
37
38
39
40
41
42
43
44
45
46
47
48
49
50
51
52
53
54
55
56
57
58
59
60
61
62
63
64
65
66
67
68
69
70
71
72
73
74
75
76
77
78
79
80
81
82
83
84
85
86
87
88
89
90
91
92
93
94
95
96
97
98
99
100
101
102
103
104
105
106
107
108
109
110
111
package org.springframework.boot.autoconfigure;

/**
* Indicates a {@link Configuration configuration} class that declares one or more
* {@link Bean @Bean} methods and also triggers {@link EnableAutoConfiguration
* auto-configuration} and {@link ComponentScan component scanning}. This is a convenience
* annotation that is equivalent to declaring {@code @Configuration},
* {@code @EnableAutoConfiguration} and {@code @ComponentScan}.
*
* @author Phillip Webb
* @author Stephane Nicoll
* @author Andy Wilkinson
* @since 1.2.0
*/
@SpringBootConfiguration //
@EnableAutoConfiguration
@ComponentScan(excludeFilters = { @Filter(type = FilterType.CUSTOM, classes = TypeExcludeFilter.class),
@Filter(type = FilterType.CUSTOM, classes = AutoConfigurationExcludeFilter.class) })
public @interface SpringBootApplication {

/**
* Exclude specific auto-configuration classes such that they will never be applied.
* @return the classes to exclude
*/
@AliasFor(annotation = EnableAutoConfiguration.class)
Class<?>[] exclude() default {};

/**
* Exclude specific auto-configuration class names such that they will never be
* applied.
* @return the class names to exclude
* @since 1.3.0
*/
@AliasFor(annotation = EnableAutoConfiguration.class)
String[] excludeName() default {};

/**
* Base packages to scan for annotated components. Use {@link #scanBasePackageClasses}
* for a type-safe alternative to String-based package names.
* <p>
* <strong>Note:</strong> this setting is an alias for
* {@link ComponentScan @ComponentScan} only. It has no effect on {@code @Entity}
* scanning or Spring Data {@link Repository} scanning. For those you should add
* {@link org.springframework.boot.autoconfigure.domain.EntityScan @EntityScan} and
* {@code @Enable...Repositories} annotations.
* @return base packages to scan
* @since 1.3.0
*/
@AliasFor(annotation = ComponentScan.class, attribute = "basePackages")
String[] scanBasePackages() default {};

/**
* Type-safe alternative to {@link #scanBasePackages} for specifying the packages to
* scan for annotated components. The package of each class specified will be scanned.
* <p>
* Consider creating a special no-op marker class or interface in each package that
* serves no purpose other than being referenced by this attribute.
* <p>
* <strong>Note:</strong> this setting is an alias for
* {@link ComponentScan @ComponentScan} only. It has no effect on {@code @Entity}
* scanning or Spring Data {@link Repository} scanning. For those you should add
* {@link org.springframework.boot.autoconfigure.domain.EntityScan @EntityScan} and
* {@code @Enable...Repositories} annotations.
* @return base packages to scan
* @since 1.3.0
*/
@AliasFor(annotation = ComponentScan.class, attribute = "basePackageClasses")
Class<?>[] scanBasePackageClasses() default {};

/**
* The {@link BeanNameGenerator} class to be used for naming detected components
* within the Spring container.
* <p>
* The default value of the {@link BeanNameGenerator} interface itself indicates that
* the scanner used to process this {@code @SpringBootApplication} annotation should
* use its inherited bean name generator, e.g. the default
* {@link AnnotationBeanNameGenerator} or any custom instance supplied to the
* application context at bootstrap time.
* @return {@link BeanNameGenerator} to use
* @see SpringApplication#setBeanNameGenerator(BeanNameGenerator)
* @since 2.3.0
*/
@AliasFor(annotation = ComponentScan.class, attribute = "nameGenerator")
Class<? extends BeanNameGenerator> nameGenerator() default BeanNameGenerator.class;

/**
* Specify whether {@link Bean @Bean} methods should get proxied in order to enforce
* bean lifecycle behavior, e.g. to return shared singleton bean instances even in
* case of direct {@code @Bean} method calls in user code. This feature requires
* method interception, implemented through a runtime-generated CGLIB subclass which
* comes with limitations such as the configuration class and its methods not being
* allowed to declare {@code final}.
* <p>
* The default is {@code true}, allowing for 'inter-bean references' within the
* configuration class as well as for external calls to this configuration's
* {@code @Bean} methods, e.g. from another configuration class. If this is not needed
* since each of this particular configuration's {@code @Bean} methods is
* self-contained and designed as a plain factory method for container use, switch
* this flag to {@code false} in order to avoid CGLIB subclass processing.
* <p>
* Turning off bean method interception effectively processes {@code @Bean} methods
* individually like when declared on non-{@code @Configuration} classes, a.k.a.
* "@Bean Lite Mode" (see {@link Bean @Bean's javadoc}). It is therefore behaviorally
* equivalent to removing the {@code @Configuration} stereotype.
* @since 2.2
* @return whether to proxy {@code @Bean} methods
*/
@AliasFor(annotation = Configuration.class)
boolean proxyBeanMethods() default true;

}

@SpringBootConfiguration#

是上面SpringBootApplication引用的一个注解,就是表明我是一个@Configuration,可以被扫描加载。起一个别名,是因为是启动类的,需要特殊一点,所需的时候可以找到。

  • proxyBeanMethods是@Configuration里面的一个注解。决定我们是否@Bean标注的方法应该使用CGlib进行代理,用来保证bean的生命周期行为。
  • 例如,即使在直接的情况下返回共享单例bean实例获得代理@Bean用户代码的方法调用。
  • 该功能要求的方法的拦截,通过它配有限制的运行时生成的CGLIB子类实现如配置类及其方法不被允许声明final 。
  • 默认为true ,允许配置类内部以及外部调用该配置的“bean间引用” @Bean 方法之间没有调用关系的话可以把 proxyBeanMethods 设置为 false以免CGLIB子类的处理。
  • 关闭bean方法拦截有效地处理@Bean方法来单独像非申报时@Configuration班,又名“@Bean精简版模式”(见@Bean’s javadoc )。 因此,它是行为上等同于除去@Configuration版本。
1
2
3
4
5
6
7
8
9
10
11
12
13
14
15
16
17
18
19
20
21
22
23
24
25
26
27
28
29
30
31
32
@Target(ElementType.TYPE)
@Retention(RetentionPolicy.RUNTIME)
@Documented
@Configuration
public @interface SpringBootConfiguration {

/**
* Specify whether {@link Bean @Bean} methods should get proxied in order to enforce
* bean lifecycle behavior, e.g. to return shared singleton bean instances even in
* case of direct {@code @Bean} method calls in user code. This feature requires
* method interception, implemented through a runtime-generated CGLIB subclass which
* comes with limitations such as the configuration class and its methods not being
* allowed to declare {@code final}.
* <p>
* The default is {@code true}, allowing for 'inter-bean references' within the
* configuration class as well as for external calls to this configuration's
* {@code @Bean} methods, e.g. from another configuration class. If this is not needed
* since each of this particular configuration's {@code @Bean} methods is
* self-contained and designed as a plain factory method for container use, switch
* this flag to {@code false} in order to avoid CGLIB subclass processing.
* <p>
* Turning off bean method interception effectively processes {@code @Bean} methods
* individually like when declared on non-{@code @Configuration} classes, a.k.a.
* "@Bean Lite Mode" (see {@link Bean @Bean's javadoc}). It is therefore behaviorally
* equivalent to removing the {@code @Configuration} stereotype.
* @return whether to proxy {@code @Bean} methods
* @since 2.2
*/
@AliasFor(annotation = Configuration.class)
boolean proxyBeanMethods() default true;

}

@EnableAutoConfiguration#

  • 这个注解用来启用Spring应用程序上下文自动配置,尝试推断和自动配置bean。
  • 自动配置类通常采用基于你的classpath中已有的bean定义。
  • 举例来说,如果你有tomcat-embedded.jar在classpath中,你可能会想TomcatServletWebServerFactory (除非您已经定义了自己ServletWebServerFactorybean)。
  • 当使用@SpringBootApplication ,自动配置上下文的,因此添加这个注解没有额外的效果。
  • 自动配置尝试将智能地实现我们自己的配置, 您可以随时手动exclude()的任何配置,(使用excludeName()如果您没有访问它们)。或者通过spring.autoconfigure.exclude配置来排除无需引入的配置类。
  • 通常通过@SpringBootApplication来使用 此注解。
    如果你不使用@SpringBootApplication, 通常建议您将@EnableAutoConfiguration放在根目录,它会去搜索所有子包和类。
  • 被自动配置类是普通的Spring @Configurationbean。 他们使用的是位于SpringFactoriesLoader机制(键控对这个类)。
    一般的自动配置bean类@Conditionalbean(最常使用@ConditionalOnClass和@ConditionalOnMissingBean注释)
1
2
3
4
5
6
7
8
9
10
11
12
13
14
15
16
17
18
19
20
21
22
23
24
25
26
27
28
29
30
31
32
33
34
35
36
37
38
39
40
41
42
43
44
45
46
47
48
49
50
51
52
53
54
55
56
/**
* Enable auto-configuration of the Spring Application Context, attempting to guess and
* configure beans that you are likely to need. Auto-configuration classes are usually
* applied based on your classpath and what beans you have defined. For example, if you
* have {@code tomcat-embedded.jar} on your classpath you are likely to want a
* {@link TomcatServletWebServerFactory} (unless you have defined your own
* {@link ServletWebServerFactory} bean).
* <p>
* When using {@link SpringBootApplication @SpringBootApplication}, the auto-configuration
* of the context is automatically enabled and adding this annotation has therefore no
* additional effect.
* <p>
* Auto-configuration tries to be as intelligent as possible and will back-away as you
* define more of your own configuration. You can always manually {@link #exclude()} any
* configuration that you never want to apply (use {@link #excludeName()} if you don't
* have access to them). You can also exclude them via the
* {@code spring.autoconfigure.exclude} property. Auto-configuration is always applied
* after user-defined beans have been registered.
* <p>
* The package of the class that is annotated with {@code @EnableAutoConfiguration},
* usually via {@code @SpringBootApplication}, has specific significance and is often used
* as a 'default'. For example, it will be used when scanning for {@code @Entity} classes.
* It is generally recommended that you place {@code @EnableAutoConfiguration} (if you're
* not using {@code @SpringBootApplication}) in a root package so that all sub-packages
* and classes can be searched.
* <p>
* Auto-configuration classes are regular Spring {@link Configuration @Configuration}
* beans. They are located using the {@link SpringFactoriesLoader} mechanism (keyed
* against this class). Generally auto-configuration beans are
* {@link Conditional @Conditional} beans (most often using
* {@link ConditionalOnClass @ConditionalOnClass} and
* {@link ConditionalOnMissingBean @ConditionalOnMissingBean} annotations).
*/

@AutoConfigurationPackage
@Import(AutoConfigurationImportSelector.class)
public @interface EnableAutoConfiguration {

String ENABLED_OVERRIDE_PROPERTY = "spring.boot.enableautoconfiguration";

/**
* Exclude specific auto-configuration classes such that they will never be applied.
* @return the classes to exclude
*/
Class<?>[] exclude() default {};

/**
* Exclude specific auto-configuration class names such that they will never be
* applied.
* @return the class names to exclude
* @since 1.3.0
*/
String[] excludeName() default {};

}

@AutoConfigurationPackage#

注册配置的basePackageClassesbasePackageClasses数组。如果没有指定这两个参数,那就注册当前配置的这个类(主启动类)

1
2
3
4
5
6
7
8
9
10
11
12
13
14
15
16
17
18
19
20
21
22
23
24
25
26
27
28
29
30
31
32
33
34
35
/**
* Registers packages with {@link AutoConfigurationPackages}. When no {@link #basePackages
* base packages} or {@link #basePackageClasses base package classes} are specified, the
* package of the annotated class is registered.
* @see AutoConfigurationPackages
*/
@Target(ElementType.TYPE)
@Retention(RetentionPolicy.RUNTIME)
@Documented
@Inherited
@Import(AutoConfigurationPackages.Registrar.class)
public @interface AutoConfigurationPackage {

/**
* Base packages that should be registered with {@link AutoConfigurationPackages}.
* <p>
* Use {@link #basePackageClasses} for a type-safe alternative to String-based package
* names.
* @return the back package names
* @since 2.3.0
*/
String[] basePackages() default {};

/**
* Type-safe alternative to {@link #basePackages} for specifying the packages to be
* registered with {@link AutoConfigurationPackages}.
* <p>
* Consider creating a special no-op marker class or interface in each package that
* serves no purpose other than being referenced by this attribute.
* @return the base package classes
* @since 2.3.0
*/
Class<?>[] basePackageClasses() default {};

}

@Configuration#

是Spring定义的一个注解,而不是Springboot才有的。@Configuration 又依赖于 @Component,是一个Spring中就有的配置类,用来标记我们的一个Class是一个类似传统xml配置文件,里面有很多Bean。在Springboot中,它是被自动装配的对象。

Spring容器启动中@Configuration的过程:

`AbstractApplicationContext::refresh–>AbstractApplicationContext::invokeBeanFactoryPostProcessors

–>ConfigurationClassPostProcessor::postProcessBeanFactory–>ConfigurationClassPostProcessor::enhanceConfigurationClasses`

  • ConfigurationClassPostProcessor::enhanceConfigurationClasses这个方法是Configuration注解工作的核心方法,
  • spring应用启动时所有的被@Configuration注解的类都会被spring cglib库生成cglib动态代理,
  • 然后其他地方通过@Autowired注解引入业务Bean类对象就会被生成的configuration配置类生成的动态代理拦截,
  • 处理完后再调用原configuration注解类的业务Bean方法获取到业务实例。

原文链接:https://blog.csdn.net/john1337/java/article/details/86544214

image-20200723101852798

SpringBoot经典问题#

都搞定了,才能说熟练掌握SpringBoot

  • BeanDefinition的定义,在spring体系当中beanDefinition的和bean的产生过程有什么关系, sping当中的各种BeanDefinition的作用
  • BeanDefinition有什么作用?如果来改变一个bean的行为, spring当中有哪些扩展点开源来修改beanDefinition
    • 标记一个类的属性,包括class、singleton、lazy、constructor、depenedson
  • BeanDefinitionRegistry的作用,源码分析,哪些开源框架利用了这个类
    • mybatis动态创建mapper的实现,注入到里面去。
  • BeanNameGenerator如何改变beanName的生成策略、如何自己写一个beanName的生成策略
  • BeanPostProcessor如何插手bean的实例化过程 经典的应用场景有哪些? spring内部哪里用到了这个接口
    • 程序员使用BPP接口实现类,可以在创建Bean之前改变bd的行为和属性,进行修改、增强。
    • 会形成一个列表,依次执行,返回null就截至不再执行了
    • 如AOP就在此时
  • BeanFactoryPostProcessor和BeanPostProcessor的区别、经典应用场景spring内部如何把他应用起来的
  • BeanDefinitionRegistryPostProcessor和BeanFactoryPostProcessor的关系已经区别, spring底层如何调用他们
    • BDRPP是BFPP的子类
  • ConfigurationClassPostProcessor这个类如何完成bean的扫描,如何完成@Bean的扫描,如何完成对@Import的解析
  • @lmoprt的三种类型,普通类,配置类ImportSelector, sprinq在底层源码当中如何来解析这三种importe
    • @import普通类,只是加载
    • @import一个ImportSelector实现,这个实现会返回一个string[],里面是选中的类名。反射得到对象
    • @import一个ImportBeanDefinitionRegistrar实现,在这个类中,可以拿到resigtry自己生成bd往里面注入。
    • 上面的@Import注解最终都是在ConfigurationClassParser#processImports中进行解析。使用了一个ImportStarck的栈数据结构进行递归的链式import。细节如:
  • 如何利用ImportSelector来完成寸spring的扩展?你所用的其他框架或者技术递明地方体现了这个类的使用
    • aop、mybatis
  • @Confiauration这注解为什么可以不加?加了和不加的区别,底层为什么使用calib
    • full,lite,后续增强
  • @Bean的方法是如何保证单例的?如果不需要单例需要这么配置?为什么需要这么配置
  • springFacoryBean和BeanFacory的区别,有哪些经典应用场景? sprina的factoryMethod的经典应用场景?
  • ImportBeanDefinitionRegistrar这个接口的作用,其他主流框架如何利用这个类来完成和spring的结合的?
  • spring是什么时候来执行后置处理器的?有哪些重要的后置处理器,比如CommonAnnotationBeanPostProcessor
  • CommonAnnotationBeanPostProcessor如何来完成spring初始化方法的回调。sprinq内部的各种Procesor的作用分别是什么
  • spring和springBoot当中的各种@Enablexx的原理是什么?如何自己实现一个?比如动态开启某某些自定义功能
  • spring如何来完成bean的循环依赖并且实例化的,什么是sprina的1OC容器,怎么通过源码来理解?
  • 其他,比如Bean的实例化过程,源码中的两次gegetSingleton的不同和相比如SpringMvc的源码分t等等…

springboot里面有大量的listener,在meta-inf里面可以看到

springcloud的fegin实现使用的是FactoryBean