certbot#
本文所有内容均可详情见文后链接摸索搞定,不过针对群晖场景的docker可以减少走弯路的摸索,特别适合群晖docker+自有域名+cloudflare场景。
简介#
-
certbot是一个快速安装和运维https证书的工具,可以使用命令行方便地安装证书.官网→
https://certbot.eff.org/ -
安装过程certbot需要校验你是域名的主人,一般使用一个txt服务或者使用新增一个指定的dns解析协议来实现.
准备DNS解析秘钥#
- 因为我的域名是由
cloudflare托管的DNS解析,所以登录cloudflare网站后台管理端,申请一个Cloudflare API credentials给到certbot去修改DNS使用. - 需要注意, 创建一个编辑部分区域的ApiToken即可,记录下这个Token后面会用到
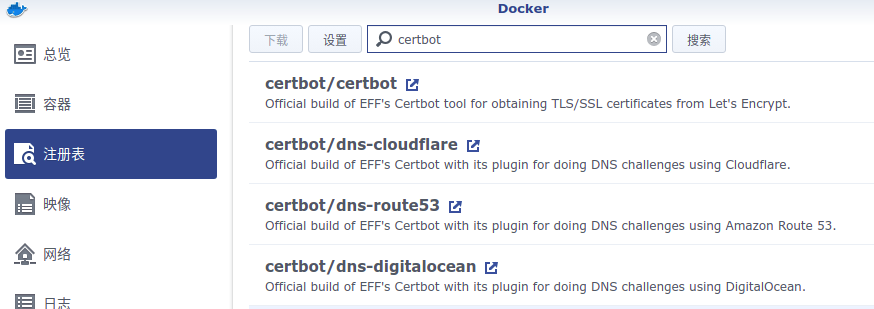
下载镜像#
- 因为我的域名是由
cloudflare托管的DNS解析,所以操作路径是群晖docker-注册表-搜索certbot-certbot/dns-cloudflare,选择下图第二个这个镜像.
启动服务#
新增一个certbot的容器,挂载以下目录:
1 | /var/log/letsencrypt |
我这里挂载如下,具体可以根据你的群晖路径调整:
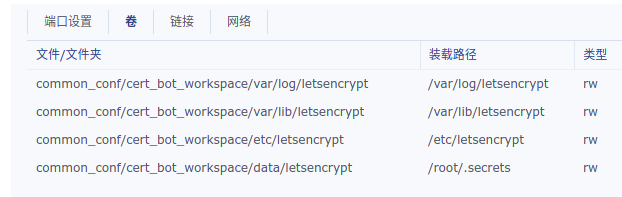
-
其中
/etc/letsencrypt是最终输出证书的工作空间,/root/.secrets是我们加载域名DNS API操纵秘钥的地方,有点绕口继续看下文. -
创建上面几个
/common_conf/cert_bot_workspace/下的文件夹 -
在
/root/.secrets对应的/common_conf/cert_bot_workspace/data/letsencrypt下创建一个cloudflare.ini文件,里面写一行1
2# Cloudflare API credentials used by Certbot
dns_cloudflare_api_token = xxxxxxx(复制上面创建的ApiToken) -
然后新增一个容器,除了磁盘挂载参考上面的结构外,其他的网络等都默认即可.其中容器所执行脚本如下:
1 | certonly --dns-cloudflare --dns-cloudflare-credentials /root/.secrets/cloudflare.ini --dns-cloudflare-propagation-seconds 60 --server https://acme-v02.api.letsencrypt.org/directory -m [email protected] -d ssssssss.com -d *.ssssssss.com |
-
启动镜像,启动后会有交互,需要登录群晖docker这个镜像的
终端机命令行进行交互,首次日志类似于:1
2
3
4
5
6
7
8
9
10
11
12
13
14
15
16
17
18
19
20
21
22
23
24
25
26
27
28
29
30Please read the Terms of Service at
https://letsencrypt.org/documents/LE-SA-v1.2-November-15-2017.pdf. You must
agree in order to register with the ACME server. Do you agree?
- - - - - - - - - - - - - - - - - - - - - - - - - - - - - - - - - - - - - - - -
(Y)es/(N)o:
(Y)es/(N)o: Y
- - - - - - - - - - - - - - - - - - - - - - - - - - - - - - - - - - - - - - - -
Would you be willing, once your first certificate is successfully issued, to
share your email address with the Electronic Frontier Foundation, a founding
partner of the Let's Encrypt project and the non-profit organization that
develops Certbot? We'd like to send you email about our work encrypting the web,
EFF news, campaigns, and ways to support digital freedom.
- - - - - - - - - - - - - - - - - - - - - - - - - - - - - - - - - - - - - - - -
(Y)es/(N)o: N
Account registered.
Requesting a certificate for ssssssss.com and *.ssssssss.com
Saving debug log to /var/log/letsencrypt/letsencrypt.log
Requesting a certificate for ssssssss.com and *.ssssssss.com
Error determining zone_id: 6003 Invalid request headers. Please confirm that you have supplied valid Cloudflare API credentials. (Did you copy your entire API token/key? To use Cloudflare tokens, you'll need the python package cloudflare>=2.3.1. This certbot is running cloudflare 2.8.15)
Ask for help or search for solutions at https://community.letsencrypt.org. See the logfile /var/log/letsencrypt/letsencrypt.log or re-run Certbot with -v for more details.
Saving debug log to /var/log/letsencrypt/letsencrypt.log
Requesting a certificate for ssssssss.com and *.ssssssss.com
Waiting 60 seconds for DNS changes to propagate
Successfully received certificate.
Certificate is saved at: /etc/letsencrypt/live/ssssssss.com/fullchain.pem
Key is saved at: /etc/letsencrypt/live/ssssssss.com/privkey.pem
This certificate expires on 2021-12-20.
These files will be updated when the certificate renews -
证书一般会生成在
/volume3/common_conf/cert_bot_workspace/etc/letsencrypt/live/ssssssss.com/cert1.pem或者归档在/volume3/common_conf/cert_bot_workspace/etc/letsencrypt/archive/ssssssss.com/cert1.pem -
这几个文件的作用在README文件中有说明:
1
2
3
4
5`privkey.pem` : the private key for your certificate.
`fullchain.pem`: the certificate file used in most server software.
`chain.pem` : used for OCSP stapling in Nginx >=1.3.7.
`cert.pem` : will break many server configurations, and should not be used
without reading further documentation (see -
在
控制面板-安全性-证书-导入证书,即可给群晖导入我们生成的证书,然后配置一下各个群晖服务使用哪个证书即可.
后续#
-
可以把这个docker镜像配置成自动启动,每次开机自动重启,需要renew的时候去
终端机命令行选择renew就会重新生成,去群晖后台重新上传替换即可You have an existing certificate that has exactly the same domains or certificate name you requested and isn’t close to expiry.
(ref: /etc/letsencrypt/renewal/sssssss.com.conf)
What would you like to do?
1: Keep the existing certificate for now
2: Renew & replace the certificate (may be subject to CA rate limits)前往终端机命令行选择[2],重新生成一个证书即可
-
也可重新新建一个容器,免交互自动每次开机检查并renew证书,只需要修改执行命令(
certonly修改成renew),别的都一样. -
我比较懒,用第一种方式就行了,因为即使免交互自动renew了,还是要管理员手动导入到群晖后台,意义不大.
Docker版本#
准备cd的api_token:
1 | mkdir -p /main/letsencrypt/secrets |
生成证书:
1 | # 生成证书 |
https://certbot-dns-cloudflare.readthedocs.io/en/stable/index.html#module-certbot_dns_cloudflare
https://blog.csdn.net/qq_39680564/article/details/107177396