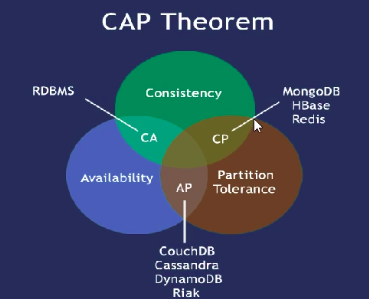
CAP理论快速简介
CAP理论关注的是粒度是数据,而不是整体系统设计。
Consistency(强一致性)
Availability(高可用性)
Partition Tolerance(分区容错性)
以上三个最多只能较好满足两个,一个系统不可能同时满足这三个需求。
CA:单点集群,满足一致性和高可用,通常在可拓展性上不强大。
CP:满足一致性,分区容忍度。通常性能不太高。
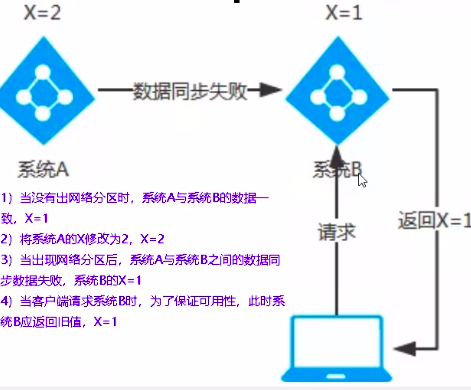
当网络分区出现后,为了保证一致性,就必须拒接请求,否则无法保证一致性。(违背A高可用)
Consul和Zk,更关注一致性,不在了很快就给干掉,但不是立刻。
AP:满足可用性和分区容忍度,通常对一致性要求较低。
当网络分区出现后,为了保证可用性,B系统可以返回旧的值,优先保证可用。(违背C一致性)
Eureka,不会立刻踢掉服务
分布式架构的P永远都要保证
图例
AP:如微博热门微博点赞数,后续柔性理论和base数据补充来保证一致性
微服务的通用定义: 是一种架构模式,提倡将单一应用划分成一组轻量级的微服务互相调用和配合,基于restful,并可以独立部署。
是一整套的较量,不是单个的组件。
本次测试版本: springboot 2.2.x+版本 spring cloud H版。如果cloud是G,boot对应2.1具体:
分布式服务包括的组件
服务注册与发现:eureka,现在不维护了。zk、Consul(golang不推荐)、用alibaba的Nacos(推荐)
服务调用:Ribbon(维护状态),后续LoadBalancer。Feign用OpenFeign。
服务熔断:hystrix(维护状态,但是大规模,思想需要学习),resilience4j(海外,国内很少),alibaba sentienl(推荐)
负载均衡:fegin
服务降级:hystrix
服务消息队列:
配置中心管理:config,推荐携程的阿波罗,或者alibaba的Nacos(推荐)
服务网关:zuul,现在用cloud gateway
服务监控
总线:bus—>alibaba Nacos
全链路监控
自动化部署
服务定时操作
分布式配置:cloud config
环境搭建
idea里面new-project-maven_architect_site
设置项目encoding utf-8
设置项目 settings-annotation processor- 勾选 enable annotation prosessing
设置java-compile是1.8
设置pom:maven项目的的聚合、依赖、传递依赖
父工程,project根目录下的pom文件修改maven,添加packaging标签为pom。
1 <packaging > pom</packaging >
dependencyManagement用在父工程,子模块继承后,提供作用:锁定版本、子module都引用一个依赖,而不用写version。
支付子module建立:
建module:在父工程右键新建module,新建完了之后父工程上会有<module>引入了
改pom
写yml
主动启动类
业务类
IDEA自动热部署配置(可选)
在子项目工程pom中添加devtools依赖包:
1 2 3 4 5 6 <dependency > <groupId > org.springframework.boot</groupId > <artifactId > spring-boot-devtools</artifactId > <scope > runtime</scope > <optional > true</optional > </dependency >
添加插件到父聚合项目的pom中
1 2 3 4 5 6 7 8 <plugin > <groupId > org.springframework.boot</groupId > <artifactId > spring-boot-maven-plugin</artifactId > <configuration > <fork > true</fork > <addResources > true</addResources > </configuration > </plugin >
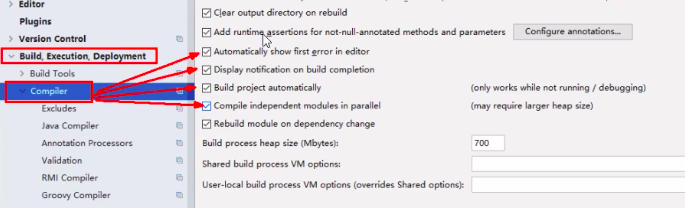
开启自动编译
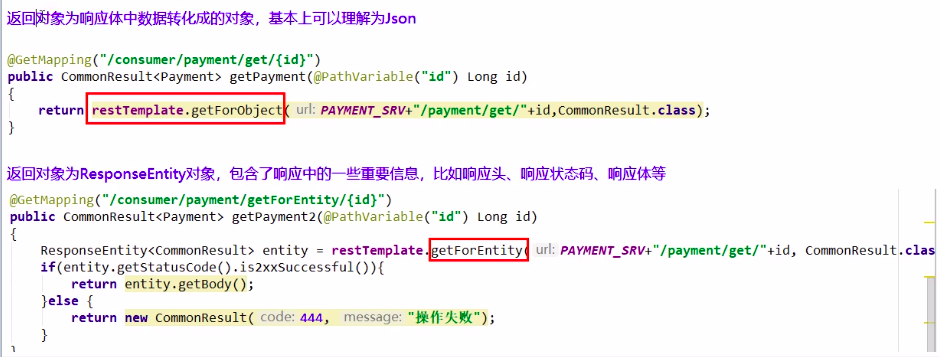
关于RestTemplate
getForObjec:返回Json对象,或者Json字符串可以格式化为对象。
getForEntity:返回ResponseEntity,除了数据,还包括网络层面的状态码、响应头等东西。
RestTemplate已经被Springcloud深度定制,底层可以支持各种客户端负载均衡策略支持,也支持自定义负载均衡策略。
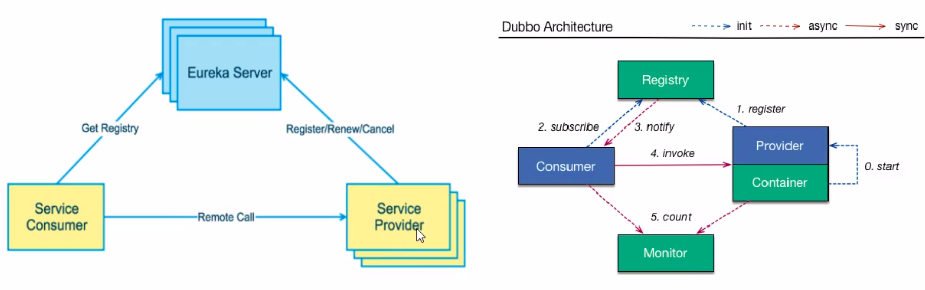
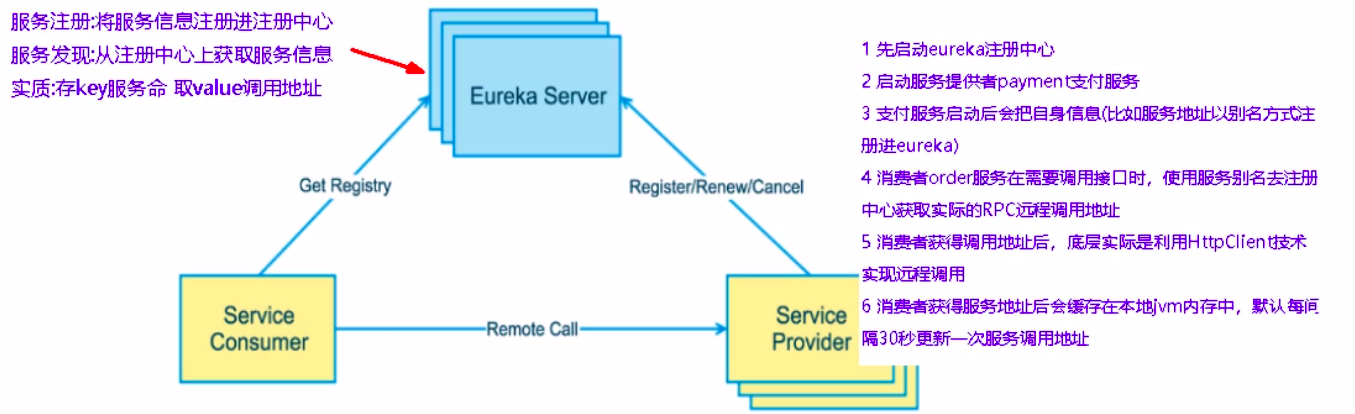
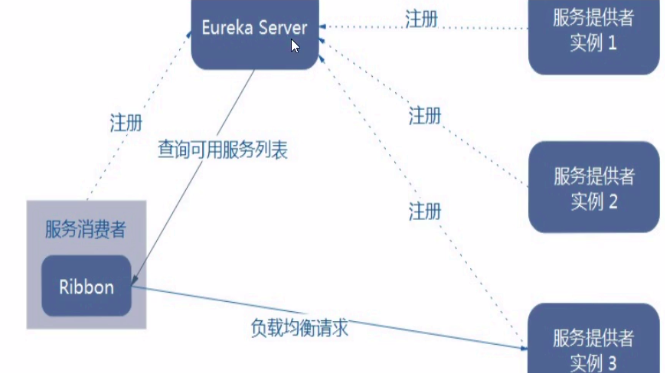
注册中心 EUREKA服务注册 传统一对第一调用,太多的时候就是网状的,需要每个客户端都去维护对端服务信息。无法统一管理,非常乱。
EUREKA作为一个注册中心的server,系统中其他services都向他链接注册并维持心跳。
这样EUREKA就能知晓所有的services的信息,就像一个电话号码本。其他service想互相调用可以来这里用service别名来询问当前可用的对端地址。
下面左边是SpringCloud,右边是Dubbo。
EUREKA分为Server和Client两个组件:
Server提供一个监听,供给其他cloud所有service进来连接。
Client是一个Java客户端,简化与Server的交互,是一个内置、轮循的负载均衡器。默认30s向Server发送一次心跳。如果Server多伦没有收到心跳就把这个节点移除。(默认90s)
EUREKA已经停止更新,后续需要迁移到别的技术栈,比如zk、consl、nacos。
工作流程
Server配置 pom.xml
2.2版本后,eureka分为server和client了,此处是server。
不用指定版本,因为父module中指定了版本。
1 2 3 4 5 <dependency > <groupId > org.springframework.cloud</groupId > <artifactId > spring-cloud-starter-netflix-eureka-server</artifactId > </dependency >
application.yml
1
2
3
4
5
6
7
8
9
10
11
server: port: 7001 eureka: instance: hostname: localhost client: register-with-eureka: false fetch-registry: false service-url: defaultZone: http://${eureka.instance.hostname}:${server.port}/eureka
Server的main类
1
2
3
4
5
6
7
8
@SpringBootApplication @EnableEurekaServer public class EurekaMain7001 { public static void main (String[] args) { SpringApplication.run(EurekaMain7001.class, args); } }
client配置 pom.xml 同上
1 2 3 4 5 6 <dependency > <groupId > org.springframework.cloud</groupId > <artifactId > spring-cloud-starter-netflix-eureka-client</artifactId > </dependency >
application.yml
1
2
3
4
5
6
eureka: client: register-with-eureka: true fetch-registry: true service-url: defaultZone: http://localhost:7001/eureka
Client的main类
1
2
3
4
5
6
7
@SpringBootApplication @EnableEurekaClient public class PaymentMain8001 { public static void main (String[] args) { SpringApplication.run(PaymentMain8001.class, args); } }
EUREKA高可用集群 高可用原理:相互注册,相互守望。
比如7001和7002有两个EUREKA,会互相注册到对方那边去。互相心跳监控。
1
2
3
4
5
6
7
8
9
10
11
server: port: 7001 eureka: instance: hostname: eureka7001.com client: register-with-eureka: false fetch-registry: false service-url: defaultZone: http://eureka7002.com:7002/eureka
1
2
3
4
5
6
7
8
9
10
server: port: 7002 eureka: instance: hostname: eureka7002.com client: register-with-eureka: false fetch-registry: false service-url: defaultZone: http://eureka7001.com:7001/eureka
1
2
3
4
5
6
7
eureka: client: register-with-eureka: true fetch-registry: true service-url: defaultZone: http://eureka7001.com:7001/eureka,eureka7002.com:7002/eureka
服务集群 当一个服务在多台机器上运行,注册到一个EUREKA中后,在EUREKA上可以看到服务的多个ip列表用逗号隔开的。
这时候假设客户端还是使用restTemplate请求的,不能写死对端服务的ip和端口,可以写EUREKA中的服务名。
这样消费端不再关注提供方的地址,而且有负载均衡功能
1 2 3 4 5 6 7 8 9 10 11 12 13 private String url = "http://CLOUD-PAYMENT-SERVICE" ; @PostMapping("/customer/payment/add") public CommonResult<Payment> create (Payment payment) { return restTemplate.postForObject(url+"/payment/add" , payment, CommonResult.class); }
但是因为服务方是多个节点,所以需要restTemplate开启负载均衡功能去调用:
1
2
3
4
5
6
7
8
9
10
11
12
13
14
@Configuration public class ApplicationContextConfig { @Bean @LoadBalanced public RestTemplate getRestTemplate () { return new RestTemplate (); } }
自我保护
一句话描述:某时刻某个微服务不能用了,Eureka不会立刻清理,依旧会对该服务的信息进行保存。
为什么?防止Eureka Server网络不通,但是Eureka Client正常运行的时候,EurekaServer不会立刻把EurekaClient剔除。
详细:默认30s一次,当90s没收到心跳就该干掉,但是如果短时间内大量丢失客户端时,这个节点就会进入自我保护机制。(此时可能大量客户端都是正常的,很可能是网络分区故障)
属于CAP里面的AP分支。(高可用、分区容错性)
server端关闭自我保护,修改
1
2
3
server: enable-self-preservation: false eviction-interval-timer-in-ms: 60000
Discovery 主启动类,开启Discovery的能力
1
2
3
4
5
6
7
8
@SpringBootApplication @EnableEurekaClient @EnableDiscoveryClient public class PaymentMain8001 { public static void main (String[] args) { SpringApplication.run(PaymentMain8001.class, args); } }
controller,注入,获取服务和实例信息
1
2
3
4
5
6
7
8
9
10
11
12
13
14
15
16
17
@Resource private DiscoveryClient discoveryClient;@GetMapping(value = "/discovery") @ResponseBody public CommonResult<Object> discovery () { System.out.println("-------------Services--------------" ); discoveryClient.getServices().forEach(System.out::println); System.out.println("-------------Instances--------------" ); List<String> instances = discoveryClient.getInstances("CLOUD-PAYMENT-SERVICE" ).stream().map(each->each.getInstanceId()+"/" +each.getHost()+":" +each.getPort()+"/" +each.getUri()).collect(Collectors.toList()); instances.forEach(System.out::println); Map<String, Object> map = new HashMap <>(); map.put("services" , discoveryClient.getServices()); map.put("instances" , instances); return CommonResult.success("discovery" ,map); }
Zookeeper服务注册 zookeeper使用临时节点存储服务的信息,一会儿心跳不出现就会干掉这个节点(不是立马干掉)。是CAP的CP,和EUREKA不太一样。
服务引入jar包
1 2 3 4 5 <dependency > <groupId > org.springframework.cloud</groupId > <artifactId > spring-cloud-starter-zookeeper-discovery</artifactId > </dependency >
application.yml只有几行不一样,指定zookeeper的连接字符串即可:
1
2
3
4
5
6
7
8
9
server: port: 8004 spring: application: name: cloud-provider-service cloud: zookeeper: connect-string: 127.0 .0 .1 :2181
主启动类,使用DescoveryClient即可
1
2
3
4
5
6
7
8
9
10
11
12
13
14
@SpringBootApplication @EnableDiscoveryClient public class PaymentZkMain8004 { public static void main (String[] args) { SpringApplication.run(PaymentZkMain8004.class, args); } }
启动后:
1
2
3
4
5
6
7
8
9
10
11
12
13
[zk: localhost:2181(CONNECTED) 7] ls / [services, zookeeper] [zk: localhost:2181(CONNECTED) 8] ls /services [cloud-provider-service] [zk: localhost:2181(CONNECTED) 10] ls /services/cloud-provider-service [ba35208f-59ea-4d70-b75f-857c5a5b0a64] [zk: localhost:2181(CONNECTED) 11] get /services/cloud-provider-service/ba35208f-59ea-4d70-b75f-857c5a5b0a64 {"name" :"cloud-provider-service" ,"id" :"ba35208f-59ea-4d70-b75f-857c5a5b0a64" ,"address" :"192.168.1.10" ,"port" :8004,"sslPort" :null,"payload" :{"@class" :"org.springframework.cloud.zookeeper.discovery.ZookeeperInstance" ,"id" :"application-1" ,"name" :"cloud-provider-service" ,"metadata" :{}},"registrationTimeUTC" :1590931922948,"serviceType" :"DYNAMIC" ,"uriSpec" :{"parts" :[{"value" :"scheme" ,"variable" :true },{"value" :"://" ,"variable" :false },{"value" :"address" ,"variable" :true },{"value" :":" ,"variable" :false },{"value" :"port" ,"variable" :true }]}} [zk: localhost:2181(CONNECTED) 12]
注入调用方 pom和application.yml和启动类一模一样,暂时用restTemplate调用,需要config一下
1
2
3
4
5
6
7
8
9
10
@Configuration public class ApplicationContextConfig { @Bean @LoadBalanced public RestTemplate getRestTemplate () { RestTemplate template = new RestTemplate (); return template; } }
customer的controller
1
2
3
4
5
6
7
8
9
10
11
12
13
14
15
16
17
18
@RestController public class ZkCustomerController { @Resource private DiscoveryClient discoveryClient; @Resource private RestTemplate restTemplate; public static final String URL = "http://cloud-provider-service" ; @GetMapping("/customer/payment/zk") public CommonResult<Payment> testZkCloud () { return restTemplate.getForObject(URL+"/payment/zk" , CommonResult.class); } }
启动后可以在zk看到双方:
1
2
[zk: localhost:2181(CONNECTED) 26] ls /services [cloud-customer-order, cloud-provider-service]
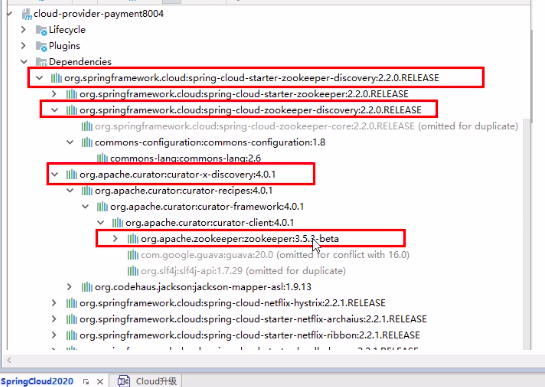
zk客户端和server jar包冲突 有可能client和server的zk jar包不一致会报错,比如客户端太新,服务端太老。
需要在cloud的zk的starter里面exclude掉zk的包,然后重新引入一个和zkServer版本一致的包即可。
Consul服务注册 简介
https://learn.hashicorp.com/consul/getting-started/agent
比如consul agent -dev启动
访问http://localhost:8500查看信息,或者:
1
2
3
4
5
6
7
8
9
10
11
12
13
14
15
16
17
18
19
20
21
curl localhost:8500/v1/catalog/nodes [ { "ID" : "890e9cd0-322b-fafc-fe58-33728d41f305" , "Node" : "treeMate" , "Address" : "127.0.0.1" , "Datacenter" : "dc1" , "TaggedAddresses" : { "lan" : "127.0.0.1" , "lan_ipv4" : "127.0.0.1" , "wan" : "127.0.0.1" , "wan_ipv4" : "127.0.0.1" }, "Meta" : { "consul-network-segment" : "" }, "CreateIndex" : 10, "ModifyIndex" : 11 } ]
服务端注册 pom.xml
1 2 3 4 5 6 7 8 9 10 11 12 13 14 15 16 17 18 19 20 21 22 23 24 25 26 27 28 29 30 31 32 33 34 35 36 37 38 39 40 41 42 43 44 45 46 47 48 <dependencies > <dependency > <groupId > org.springframework.cloud</groupId > <artifactId > spring-cloud-starter-consul-discovery</artifactId > </dependency > <dependency > <groupId > org.springframework.boot</groupId > <artifactId > spring-boot-starter-web</artifactId > </dependency > <dependency > <groupId > org.springframework.boot</groupId > <artifactId > spring-boot-starter-actuator</artifactId > </dependency > <dependency > <groupId > com.sam.cloud</groupId > <artifactId > cloud-api-commons</artifactId > <version > ${project.version}</version > </dependency > <dependency > <groupId > org.springframework.boot</groupId > <artifactId > spring-boot-devtools</artifactId > <scope > runtime</scope > <optional > true</optional > </dependency > <dependency > <groupId > org.projectlombok</groupId > <artifactId > lombok</artifactId > <optional > true</optional > </dependency > <dependency > <groupId > org.springframework.boot</groupId > <artifactId > spring-boot-starter-test</artifactId > <scope > test</scope > </dependency > <dependency > <groupId > org.springframework.boot</groupId > <artifactId > spring-boot-devtools</artifactId > <scope > runtime</scope > <optional > true</optional > </dependency > </dependencies >
主启动类
1
2
3
4
5
6
7
8
@SpringBootApplication @EnableDiscoveryClient public class PaymentConsulMain8004 { public static void main (String[] args) { SpringApplication.run(PaymentConsulMain8004.class, args); } }
application.yml
1
2
3
4
5
6
7
8
9
10
11
12
server: port: 8004 spring: application: name: cloud-provider-service cloud: consul: discovery: service-name: ${spring.application.name} hostname: localhost host: localhost
controller只是一个简单的数据模拟
1
2
3
4
5
6
7
8
9
10
11
12
13
14
15
16
17
18
@RestController public class PaymentConsulController { @Value("${server.port}") private String port; @GetMapping("/payment/consul") public CommonResult<Payment> testConsulPayment () { Payment payment = new Payment (); payment.setId(RandomUtils.nextLong()); payment.setSerial("这是一个模拟的随机payment," + RandomStringUtils.randomAlphabetic(16 )); return CommonResult.success("I'm Consul Client on:" +port,payment); } }
启动后就可以在上面的ui中看到。
客户端注册 pom application 都一毛一样,config、主启动类、controller和上面zk的一毛一样(因为暂时没用openFeign和ribbon),没啥可写的。
Eureka、Zookeeper、Consul的对比
组件
CAP
对外接口
Eureka
AP
Http
Consul
CP
Http/DNS
Zookeeper
CP
客户端
C主要是数据一致,Eureka主要保证高可用。
Ribbon Ribbon简介 是一套客户端的负载均衡工具 ,如链接超时、重试等,配置文件只用列出所有的节点,Ribbon自动基于规则(轮询、随机、响应时间加权等)去链接,也很容易自定义实现负载均衡。
官网在github,目前也是维护模式了。未来的趋势是Spring的LoadBalancer,但是还很不成熟。
Ribbon:
本地负载均衡,进程内。调用前从注册中心获取服务信息,缓存到JVM,本地负载均衡。
负载均衡+RestTemplate进行RPC,可以和多种客户端结合。Eureka只是其中之一。
工作时分两步:
先选择注册中心,比如先从注册中心选择一个负担小的Eureka
根据用户指定的策略,从注册地址取到一个进行。
Nginx:是服务端的LB。
新版2.2.x的springcloud的eureka会自动引入ribbon:
1 2 3 4 5 6 7 8 9 10 <dependency > <groupId > org.springframework.cloud</groupId > <artifactId > spring-cloud-starter-netflix-eureka-client</artifactId > </dependency >
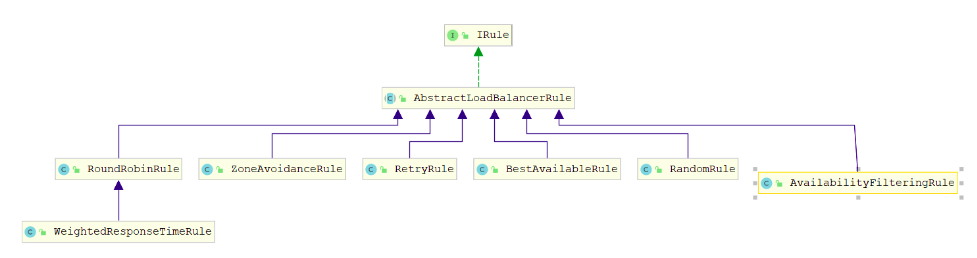
Ribbon的负载均衡策略 都是IRule的实现,策略模式。
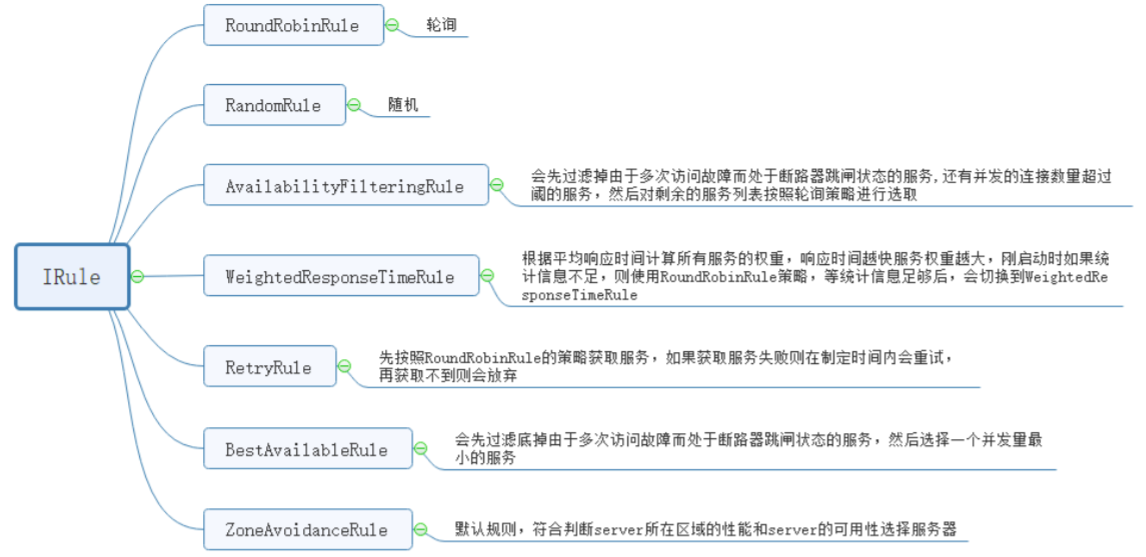
RoundRobinRule: 默认轮询的方式
RandomRule: 随机方式
WeightedResponseTimeRule: 根据响应时间来分配权重的方式,响应的越快,分配的值越大。
BestAvailableRule: 选择并发量最小的方式
RetryRule: 在一个配置时间段内当选择server不成功,则一直尝试使用subRule的方式选择一个可用的server。
ZoneAvoidanceRule: 根据性能和可用性来选择。
AvailabilityFilteringRule: 过滤掉那些因为一直连接失败的被标记为circuit tripped的后端server,并过滤掉那些高并发的的后端server(active connections 超过配置的阈值)
其他负载均衡算法: http://dubbo.apache.org/zh-cn/docs/source_code_guide/loadbalance.html
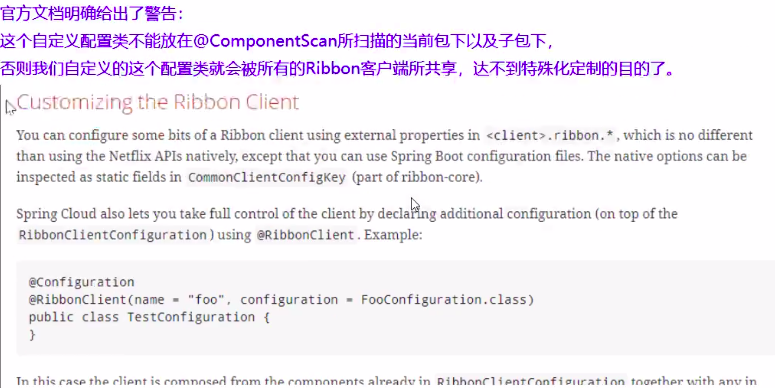
自定义规则 注意事项: 自定义ribbon规则类,不能放在@ComponentsScan所能扫描的包和子包内(主启动类和以下所有包)。否则这个配置类会被所有的Ribbon客户端共享,达不到特殊定制化目的。
注意@ComponentScan 和@SpringBootApplication注解都不要扫描到。
原始的轮询规则
默认的那个轮询规则:
discoveryClient拿到所有的Server实例,然后搞一个int计数,每次取模决定返回哪个Server。
里面有自旋锁、AQS,避免重量级锁。
1
2
3
4
5
6
7
8
9
10
11
12
13
14
15
16
17
18
19
20
21
22
23
24
25
26
27
28
29
30
31
32
33
34
35
36
37
38
39
40
41
42
43
44
45
46
47
48
49
50
51
52
53
54
55
56
57
58
59
60
private AtomicInteger nextServerCyclicCounter; public Server choose (ILoadBalancer lb, Object key) { if (lb == null ) { log.warn("no load balancer" ); return null ; } Server server = null ; int count = 0 ; while (server == null && count++ < 10 ) { List<Server> reachableServers = lb.getReachableServers(); List<Server> allServers = lb.getAllServers(); int upCount = reachableServers.size(); int serverCount = allServers.size(); if ((upCount == 0 ) || (serverCount == 0 )) { log.warn("No up servers available from load balancer: " + lb); return null ; } int nextServerIndex = incrementAndGetModulo(serverCount); server = allServers.get(nextServerIndex); if (server == null ) { Thread.yield(); continue ; } if (server.isAlive() && (server.isReadyToServe())) { return (server); } server = null ; } if (count >= 10 ) { log.warn("No available alive servers after 10 tries from load balancer: " + lb); } return server; } private int incrementAndGetModulo (int modulo) { for (;;) { int current = nextServerCyclicCounter.get(); int next = (current + 1 ) % modulo; if (nextServerCyclicCounter.compareAndSet(current, next)) return next; } }
定义手动实现一个负载均衡 步骤:
ApplicationContextConfig对象上面去掉@LoadBalanced注解(restTemplate上面),否则就会使用ribbon自带的策略
写一个LoadBalanced接口
实现接口来一个choose方法,使用discoverClient去根据策略选择一个instance
在controller的请求时候注入这个负载均衡,choose一个insrance,拿到uri,拼装请求地址。
1
2
3
4
5
6
7
8
9
10
11
12
13
14
15
16
17
18
19
20
21
22
23
24
25
26
27
28
29
30
31
32
33
@Component public class MyLoadBalancer implements ICustomerLoadBalancer { private AtomicInteger integer = new AtomicInteger (0 ); @Override public ServiceInstance chooseInstance (List<ServiceInstance> instances) { if (instances == null || instances.isEmpty()){ System.out.println("没有可用的服务!!!!!" ); return null ; } int i = incrementAndGet() % instances.size(); return instances.get(i); } private final int incrementAndGet () { int curr,next; do { curr = integer.get(); next = curr > Integer.MAX_VALUE ? 0 : curr+1 ; }while (!integer.compareAndSet(curr, next)); System.out.println("------------------next:" +next); return next; } }
controller,使用上面的loadbalancer手动获取instance地址url地址
1 2 3 4 5 6 7 8 9 10 11 12 13 @GetMapping("/customer/payment/lb/get/{id}") public CommonResult<Payment> getByIdByHanLoadBalancer (@PathVariable("id") long id) { List<ServiceInstance>instances = discoveryClient.getInstances("CLOUD-PAYMENT-SERVICE" ); ServiceInstance instance = myLoadBalancer.chooseInstance(instances); return restTemplate.getForObject(instance.getUri()+"/payment/get/" +id, CommonResult.class); }
动手实现一个自定义ribbon策略
自定义策略,实现IRule接口,或者继承自AbstractLoadBalancerRule
在@SpringBootApplication扫描位置外定义一个Config,里面配置我们的自定义策略
在主启动类加上我们的自定义策略配置
RestTemplate类加上@LoadBalanced注解controller正常请求类似
自定义Rule实现:
1
2
3
4
5
6
7
8
9
10
11
12
13
14
15
16
17
18
19
20
21
22
23
24
25
26
27
28
29
30
31
32
33
34
35
36
37
38
39
40
41
42
43
44
45
46
47
48
49
50
51
52
53
54
55
56
57
58
59
60
61
62
63
64
65
66
67
68
69
70
71
72
73
public class MyRibbonRule extends AbstractLoadBalancerRule { @Resource private DiscoveryClient discoveryClient; AtomicInteger integer = new AtomicInteger (0 ); private Server choose (ILoadBalancer lb, Object key) { if (lb == null ) { return null ; } Server server = null ; while (server == null ) { if (Thread.interrupted()) { return null ; } List<Server> upList = lb.getReachableServers(); int i = integer.getAndIncrement(); System.out.println("MyRibbonRule----integer-cnt=" +i); if (i > Integer.MAX_VALUE){ integer.set(0 ); } server = upList.get(i%upList.size()); if (server == null ) { Thread.yield(); continue ; } if (server.isAlive()) { return (server); } server = null ; Thread.yield(); } return server; } @Override public void initWithNiwsConfig (IClientConfig iClientConfig) { System.out.println("--------------init rule-------------" ); System.out.println(iClientConfig.getClientName()); System.out.println(iClientConfig.getProperties()); } @Override public Server choose (Object key) { return choose(getLoadBalancer(), key); } }
配置实例化:
1
2
3
4
5
6
7
8
9
10
11
12
13
14
15
16
17
18
19
20
@Configuration public class ApplicationContextConfig { @Bean @LoadBalanced public RestTemplate getRestTemplate () { return new RestTemplate (); } @Bean public IRule getRule () { return new MyRibbonRule (); } }
主启动类
1
2
3
4
5
@SpringBootApplication @EnableEurekaClient @RibbonClient(name = "CLOUD-PAYMENT-SERVICE", configuration = MyRibbonRule.class) @EnableDiscoveryClient public class CustomerMyRibbonMain8083 {
controller:
1 2 3 4 5 6 7 8 9 10 @GetMapping("/customer/payment/rule/get/{id}") public CommonResult<Payment> getByIdByIRuleBalancer (@PathVariable("id") long id) { return restTemplate.getForObject(url+"/payment/get/" +id, CommonResult.class); }
参考链接:
https://blog.csdn.net/qq_41211642/article/details/104772140#comments