spring源码浅析

Spring#

虽然编码多年,我们再来重新认识Spring这个老朋友:

  • spring有一大堆项目,核心的spring framework,以及发展而来的springboot、springcloud,工具类的spring-data、spring-security等
  • spring framework通常的误区大家说他有IOC和AOP,然而并不是。
    • 他的核心至少有: IoC Container, Events, Resources, i18n, Validation, Data Binding, Type Conversion, SpEL, AOP.
    • 常用附加的还有:Transactions、JDBC、Spring MVC, WebSocket、JMS
    • 以及新兴的:Spring WebFlux
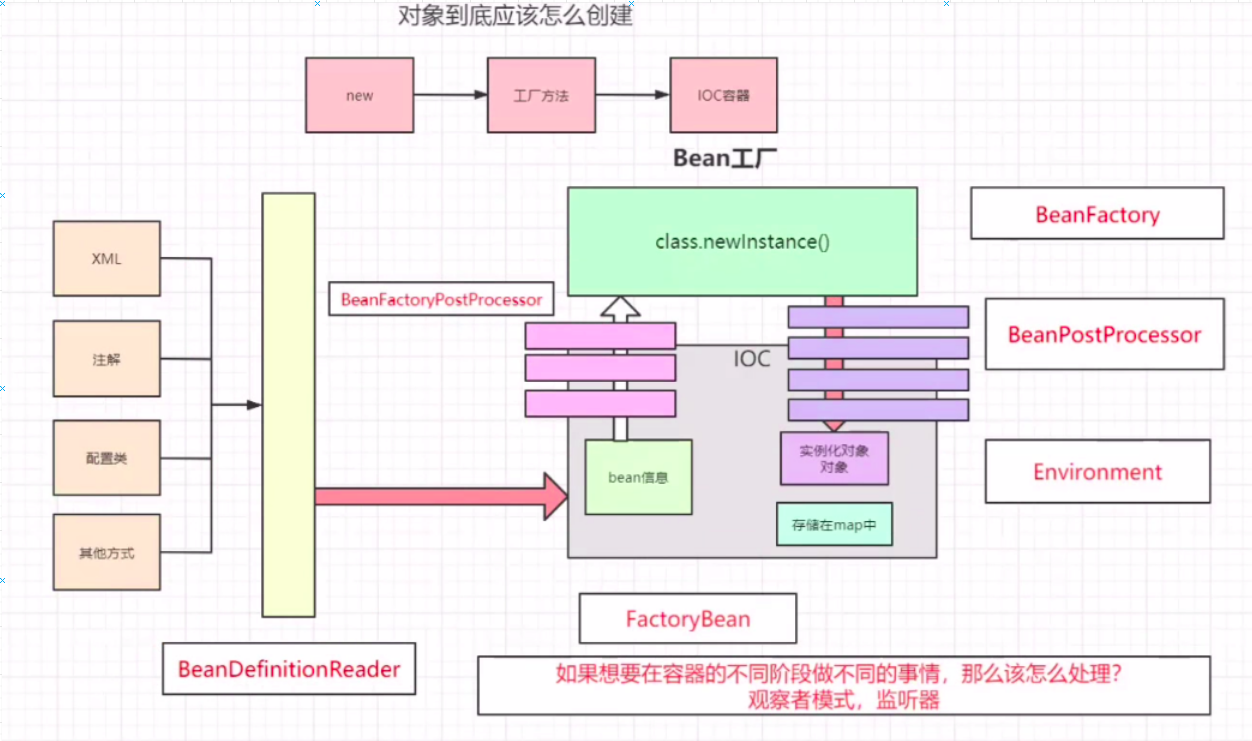
BeanDefinition#

用来描述我们的Bean的信息,Bean不是普通的对象。不像Java使用一个XXX.getClass()就能描述这个对象(包括接口、字段、方法等)。Bean的信息更多(是否Singleton、是否是Spring特有的、DependsOn、Lazy)

IOC#

控制反转(Inversion of Control,缩写为IoC),是面向对象编程中的一种设计原则,可以用来减低计算机代码之间的耦合度。其中最常见的方式叫做依赖注入(Dependency Injection,简称DI),还有一种方式叫“依赖查找”(Dependency Lookup)

  • 我们使用DI完成IOC看起来编码似乎复杂度增加,有啥优势呢:
    • 我们推荐面向抽象编程,这样可以更灵活。而面向抽象编程会产生类的依赖(具体使用哪个实现的问题)
    • 基于抽象编程除了更灵活外,接触耦合可以给我们带来更强大的增强和拓展(如AOP增强)。最经典的基于代理的事务管理就可以实现。
    • spring给我们提供一种机制来管理我们的依赖关系,就是IOC容器。

一些细节#

  • xml和annotation是可以混用的。如果在XMLApplicationContext中默认是没有开启注解的,此时想要使用annotation-based还是需要一个xml,在里面配置<context:component-scan base-package="com.xxx"> 。这一行会开启注解+自动扫描两个功能。
  • JavaConfig使用AnnotationConfigApplicationContext就不需要再次开启,默认是开启的。

xml细节#

  • 可以schema-based的XML方式管理 ,annotaion-based注解方式管理,java-based使用javabean管理

    1
    2
    3
    4
    5
    6
    7
    8
    9
    10
    11
    12
    13
    14
    15
    16
    17
    18
    19
    20
    21
    22
    23
    24
    25
    26
    27
    28
    29
    30
    31
    32
    33
    34
    35
    36
    37
    38
    39
    40
    41
    42
    43
    44
    45
    46
    47
    48
    49
    50
    51
    52
    53
    <?xml version="1.0" encoding="UTF-8"?>
    <beans xmlns="http://www.springframework.org/schema/beans"
    xmlns:xsi="http://www.w3.org/2001/XMLSchema-instance"
    xmlns:context="http://www.springframework.org/schema/context"
    xmlns:p="http://www.springframework.org/schema/p"
    xmlns:c="http://www.springframework.org/schema/c"
    xsi:schemaLocation="http://www.springframework.org/schema/beans http://www.springframework.org/schema/beans/spring-beans.xsd http://www.springframework.org/schema/context https://www.springframework.org/schema/context/spring-context.xsd">

    <!--spring的p、c、contecxt等标签的xsd在jar包里,所以不用写远程xsd地址也会自动提示--/>

    <!-- https://blog.csdn.net/fox_bert/article/details/80793030 -->
    <!-- 这一行就可以开启注解自动扫描,此时就是注解+xml混用 -->
    <context:component-scan base-package="com.sam.bean"/>

    <bean id="school" class="com.sam.bean.School">
    <property name="schoolName" value="xxx小学"></property>
    <property name="student" ref="zhangsan"></property>
    </bean>

    <!--可以使用p属性完成属性注入-->
    <bean id="zhangsan" class="com.sam.bean.Student" p:age="5">
    <property name="name" value="张三"></property>
    <!-- <property name="age" value="5"></property>-->
    <property name="dad" ref="laozhang"></property>
    </bean>

    <bean id="laozhang" class="com.sam.bean.Person">
    <property name="name" value="老张"/>
    <property name="company" ref="school"/>
    <property name="job" value="teacher"/>
    </bean>

    <!-- 构造器的循环依赖,无法解决 -->
    <!--构造器也可以用c属性实现-->
    <!-- <bean id="school" class="com.sam.bean.School" c:schoolName="xxx小学" c:student-ref="zhangsan"/>
    -->
    <!-- <bean id="school" class="com.sam.bean.School">-->
    <!-- <constructor-arg name="schoolName" value="xxx小学"></constructor-arg>-->
    <!-- <constructor-arg name="student" ref="zhangsan"></constructor-arg>-->
    <!-- </bean>-->

    <!-- <bean id="zhangsan" class="com.sam.bean.Student">-->
    <!-- <constructor-arg name="age" value="5"></constructor-arg>-->
    <!-- <constructor-arg name="name" value="张三"></constructor-arg>-->
    <!-- <constructor-arg name="dad" ref="laozhang"></constructor-arg>-->
    <!-- </bean>-->

    <!-- <bean id="laozhang" class="com.sam.bean.Person">-->
    <!-- <constructor-arg name="company" ref="school"></constructor-arg>-->
    <!-- <constructor-arg name="name" value="老张"></constructor-arg>-->
    <!-- <constructor-arg name="job" value="teacher"></constructor-arg>-->
    <!-- </bean>-->
    </beans>

注解细节#

  • @Autowired默认使用byType进行配置,重复的话去byName,多个实现的Class驼峰和属性name不一样就不知道哪个会报错。此时可以用@Primary指定优先一个。或者用@Qualifier ("xxxImpl")去配合使用
  • @Resource默认使用byName进行配置。
  • 当一个单例对象引用另一个多例对象的时候,直接@Autowaired或者@Resource会有问题,被引用的多例对象只会创建一次,变成一个单例对象。此时解决方案:
    • 给单例对象实现ApplicationContextAware注入context,每次去context里面getBean就会拿到多例对象,但是侵入性太高。
    • Lookup Method Injection方法注入:@Lookup注解放到一个抽象方法上去获取bean,那么spring会直接每次给你一个新的(必然是代理模式实现的
1
2
3
4
5
6
7
8
9
10
11
12
13
14
// 一个单例对象
@Service
public abstract class CommandManager {

public Object process(Object commandState) {
MyCommand command = createCommand();
command.setState(commandState);
return command.execute();
}

// 引用一个多例对象
@Lookup
protected abstract MyCommand createCommand();
}

其他细节#

  • profile当前生效的配置环境,可以自己起名字,默认是default-profile。可以在@Configuration(或者在单独一个Class,但是很少用)的类名上写上@Profile("test"),那么就只有测试环境test的时候才会生效。
  • profile怎么获取到的呢?他是放在environment里面的,可以从applicatoincontext.xml加载,或者java里面设置context.getEnvirionment().setActiveprofiles("test"),但是java设置之后要使用context.resresh()才能生效。

启动过程#

image-20200708002705325

BeanDefinitionRegistryPostProcessorBeanFactoryPostProcessor的子接口

注解启动的ConfigurationClassPostProcessor就是典型实现。

spring解决循环依赖方案#

首先有两种循环依赖(一般都是说单例的问题),constructor的循环依赖问题无法解决。setter的循环依赖可以解决。

注册到DefaultSingletonBeanRegistry的对象有三级缓存,getSingleton获取的时候可以提前暴露暂时还没setter完的对象。
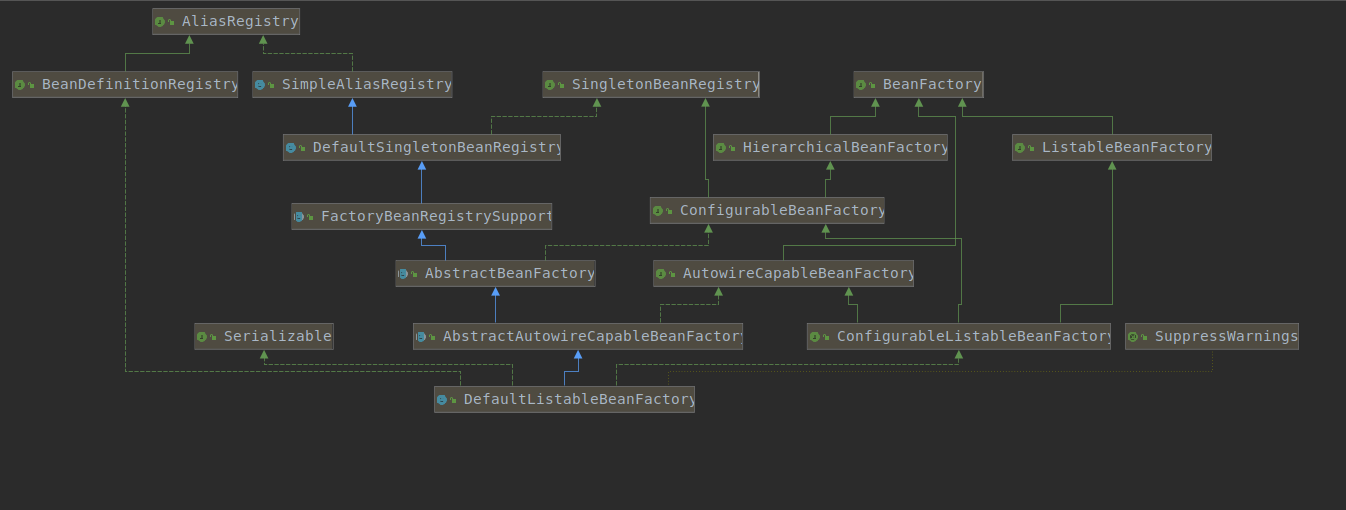
image-20200709131933087

  • 这个DefaultSingletonBeanRegistry是默认Bean工厂DefaultListableBeanFactory的父类。所以beanFactory也是注册中心:
1
2
3
4
5
6
7
8
9
10
11
12
13
14
15
16
17
18
19
20
21
22
23
24
25
26
27
28
29
30
31
32
33
34
35
36
37
38
39
40
41
42
43
44
45
46
47
48
49
50
51
52
53
54
55
56
57
58
59
60
61
62
63
64
65
66
67
68
69
70
71
72
73
74
75
76
77
78
79
80
81
82
83
84
85
86
87
88
89
90
91
92
93
94
95
96
97
98
99
100
101
102
103
104
105
106
107
108
109
110
111
112
113
114
115
116
117
118
119
120
121
122
123
124
125
126
127
128
129
130
131
132
133
134
135
136
137
138
139
140
141
142
143
144
145
146
147
148
149
150
151
152
153
154
155
156
157
158
159
160
161
162
163
164
165
166
167
168
169
170
171
172
173
174
175
176
177
178
179
180
181
182
183
184
185
186
187
188
189
190
191
192
public class DefaultSingletonBeanRegistry extends SimpleAliasRegistry implements SingletonBeanRegistry {

// 一级缓存,放单例对象
/** Cache of singleton objects: bean name to bean instance. */
private final Map<String, Object> singletonObjects = new ConcurrentHashMap<>(256);

// 三级缓存,从factory获取对象
/** Cache of singleton factories: bean name to ObjectFactory. */
private final Map<String, ObjectFactory<?>> singletonFactories = new HashMap<>(16);

// 二级缓存,刚创建好还没setter的对象
/** Cache of early singleton objects: bean name to bean instance. */
private final Map<String, Object> earlySingletonObjects = new HashMap<>(16);

// 已经注册好的bean的名字
/** Set of registered singletons, containing the bean names in registration order. */
private final Set<String> registeredSingletons = new LinkedHashSet<>(256);

// 正在创建的bean的名字
/** Names of beans that are currently in creation. */
private final Set<String> singletonsCurrentlyInCreation =
Collections.newSetFromMap(new ConcurrentHashMap<>(16));

/** Names of beans currently excluded from in creation checks. */
private final Set<String> inCreationCheckExclusions =
Collections.newSetFromMap(new ConcurrentHashMap<>(16));

/** List of suppressed Exceptions, available for associating related causes. */
@Nullable
private Set<Exception> suppressedExceptions;

/** Flag that indicates whether we're currently within destroySingletons. */
private boolean singletonsCurrentlyInDestruction = false;

/** Disposable bean instances: bean name to disposable instance. */
private final Map<String, Object> disposableBeans = new LinkedHashMap<>();

/** Map between containing bean names: bean name to Set of bean names that the bean contains. */
private final Map<String, Set<String>> containedBeanMap = new ConcurrentHashMap<>(16);

/** Map between dependent bean names: bean name to Set of dependent bean names. */
private final Map<String, Set<String>> dependentBeanMap = new ConcurrentHashMap<>(64);

/** Map between depending bean names: bean name to Set of bean names for the bean's dependencies. */
private final Map<String, Set<String>> dependenciesForBeanMap = new ConcurrentHashMap<>(64);


// 创建对象的时候要分别往三个缓存作用域合适的里面put


// 解决setter循环依赖的核心代码,使用了三级缓存

/**
* Return the (raw) singleton object registered under the given name.
* <p>Checks already instantiated singletons and also allows for an early 允许提前暴露,来解决循环依赖的问题
* reference to a currently created singleton (resolving a circular reference).
* @param beanName the name of the bean to look for
* @param allowEarlyReference whether early references should be created or not
* @return the registered singleton object, or {@code null} if none found
*/
@Nullable
protected Object getSingleton(String beanName, boolean allowEarlyReference) {
Object singletonObject = this.singletonObjects.get(beanName); // 一级缓存
if (singletonObject == null && isSingletonCurrentlyInCreation(beanName)) {
synchronized (this.singletonObjects) {
singletonObject = this.earlySingletonObjects.get(beanName); // 二级缓存
if (singletonObject == null && allowEarlyReference) {
ObjectFactory<?> singletonFactory = this.singletonFactories.get(beanName); // 三级缓存,把bean对象提前暴露出出来了
if (singletonFactory != null) {
singletonObject = singletonFactory.getObject();
this.earlySingletonObjects.put(beanName, singletonObject);
this.singletonFactories.remove(beanName);
}
}
}
}
return singletonObject;
}

/**
* Return the (raw) singleton object registered under the given name,
* creating and registering a new one if none registered yet.
* @param beanName the name of the bean
* @param singletonFactory the ObjectFactory to lazily create the singleton
* with, if necessary
* @return the registered singleton object
*/
public Object getSingleton(String beanName, ObjectFactory<?> singletonFactory) {
Assert.notNull(beanName, "Bean name must not be null");
synchronized (this.singletonObjects) {
Object singletonObject = this.singletonObjects.get(beanName);
if (singletonObject == null) {
if (this.singletonsCurrentlyInDestruction) {
throw new BeanCreationNotAllowedException(beanName,
"Singleton bean creation not allowed while singletons of this factory are in destruction " +
"(Do not request a bean from a BeanFactory in a destroy method implementation!)");
}
if (logger.isDebugEnabled()) {
logger.debug("Creating shared instance of singleton bean '" + beanName + "'");
}
beforeSingletonCreation(beanName);
boolean newSingleton = false;
boolean recordSuppressedExceptions = (this.suppressedExceptions == null);
if (recordSuppressedExceptions) {
this.suppressedExceptions = new LinkedHashSet<>();
}
try {
singletonObject = singletonFactory.getObject();
newSingleton = true;
}
catch (IllegalStateException ex) {
// Has the singleton object implicitly appeared in the meantime ->
// if yes, proceed with it since the exception indicates that state.
singletonObject = this.singletonObjects.get(beanName);
if (singletonObject == null) {
throw ex;
}
}
catch (BeanCreationException ex) {
if (recordSuppressedExceptions) {
for (Exception suppressedException : this.suppressedExceptions) {
ex.addRelatedCause(suppressedException);
}
}
throw ex;
}
finally {
if (recordSuppressedExceptions) {
this.suppressedExceptions = null;
}
afterSingletonCreation(beanName);
}
if (newSingleton) {
addSingleton(beanName, singletonObject);
}
}
return singletonObject;
}
}


@Override
public void registerSingleton(String beanName, Object singletonObject) throws IllegalStateException {
Assert.notNull(beanName, "Bean name must not be null");
Assert.notNull(singletonObject, "Singleton object must not be null");
synchronized (this.singletonObjects) {
Object oldObject = this.singletonObjects.get(beanName);
if (oldObject != null) {
throw new IllegalStateException("Could not register object [" + singletonObject +
"] under bean name '" + beanName + "': there is already object [" + oldObject + "] bound");
}
addSingleton(beanName, singletonObject);
}
}

/**
* Add the given singleton object to the singleton cache of this factory.
* <p>To be called for eager registration of singletons.
* @param beanName the name of the bean
* @param singletonObject the singleton object
*/
protected void addSingleton(String beanName, Object singletonObject) {
synchronized (this.singletonObjects) {
this.singletonObjects.put(beanName, singletonObject); // 注册到一级缓存singletonObjects中
this.singletonFactories.remove(beanName); // 同时从二级、三级缓存删除这个bean
this.earlySingletonObjects.remove(beanName);
this.registeredSingletons.add(beanName); // 把bean的名字注册到set中去
}
}

/**
* Add the given singleton factory for building the specified singleton
* if necessary.
* <p>To be called for eager registration of singletons, e.g. to be able to
* resolve circular references.
* @param beanName the name of the bean
* @param singletonFactory the factory for the singleton object
*/
protected void addSingletonFactory(String beanName, ObjectFactory<?> singletonFactory) {
Assert.notNull(singletonFactory, "Singleton factory must not be null");
synchronized (this.singletonObjects) {
if (!this.singletonObjects.containsKey(beanName)) {
this.singletonFactories.put(beanName, singletonFactory);
this.earlySingletonObjects.remove(beanName);
this.registeredSingletons.add(beanName);
}
}
}
}

SpringFramework的拓展点#

官网关于拓展点的链接:

https://docs.spring.io/spring/docs/5.2.7.RELEASE/spring-framework-reference/core.html#beans-factory-extension

先说结论:一般来说开发者无需自己去实现一个ApplicationContext进行拓展(虽然在诸如refresh方法中预留了拓展类),而是选用实现spring的插件式接口进行拓展。

通过 BeanPostProcesso定制化Bean#

如果要更改实际的bean实例(即从配置元数据创建的对象),则需要使用BeanPostProcessor进行拓展。可以插手Bean创建的过程,可以是多个BPP链式执行,可以减轻BF的负担。

如AOP就是Bean实例化的期间通过BPP织入切面逻辑到代理对象的。

  • what:BeanPostProcessor接口定义回调方法,可以实现这些回调方法来提供您自己的(或覆盖容器的缺省)实例化逻辑依赖项解析逻辑等。 如果希望在Spring容器完成实例化、配置和初始化bean之后实现一些自定义逻辑,可以插入一个或多个自定义BeanPostProcessor实现。

  • 后处理器可以对bean实例执行任何操作,如回调接口、包装Bean。比如 一些Spring AOP基础结构类被实现为bean后处理器,以提供代理包装逻辑。

  • **when:**当类被注册为BeanPostProcessor时,对于容器创建的每个bean实例,后处理器都会在容器初始化方法(如InitializingBean.afterPropertiesSet()或 任何声明的init方法),并在任何bean初始化回调之后被调用。

  • how: 自动检测。ApplicationContext自动检测实现BeanPostProcessor接口的所有bean。 ApplicationContext将这些bean注册BFPP,以便以后在bean创建时可以调用它们。

  • **other:**可以配置多个BeanPostProcessor实例,通过设置order属性并实现Ordered接口来控制这些BeanPostProcessor实例的执行顺序。

1
2
3
4
5
6
7
8
9
10
11
12
13
14
15
16
17
package scripting;
import org.springframework.beans.factory.config.BeanPostProcessor;

public class InstantiationTracingBeanPostProcessor implements BeanPostProcessor {

// 在bean的init方法之前执行(constructor-----此方法-----init方法)
// simply return the instantiated bean as-is
public Object postProcessBeforeInitialization(Object bean, String beanName) {
return bean; // we could potentially return any object reference here...
}

//constructor-----上面方法-----init方法-----此方法
public Object postProcessAfterInitialization(Object bean, String beanName) {
System.out.println("Bean '" + beanName + "' created : " + bean.toString());
return bean;
}
}

通过拓展BeanFactoryPostProcessor自定义配置信息#

  • what:BeanFactoryPostProcessor对Bean配置**元数据(METADATA)**进行操作。 也就是说,Spring IoC容器允许BeanFactoryPostProcessor读取配置元数据,并有可能在容器实例化除BeanFactoryPostProcessor实例以外的任何bean之前更改它。(官网原文,说的很严谨)。同样可以使用Orderd进行排序。

  • wheh:BeanFactoryPostProcessor在ApplicationContext中声明后会自动执行,以便将更改应用于定义容器的配置元数据。 Spring包含许多预定义的BFPP,例如PropertyOverrideConfigurerPropertySourcesPlaceholderConfigurer。 我们也可以使用自定义BeanFactoryPostProcessor,例如注册自定义属性编辑器

  • **how:**自动检测,ApplicationContext自动检测实现BeanFactoryPostProcessor接口的Bean。它在适当的时候将这些bean用作BFPP

BeanFactory和FactoryBean#

  • FactoryBean是一个
1
2
3
4
5
6
7
8
9
10
11
12
13
14
15
16
17
18
19
20
21
22
23
24
25
26
27
28
29
30
31
32
33
34
/**
* 一个FactoryBean有三个接口
* getObject()、getObjectType()、isSingleton()
*/
@Data
@Component
// 此处注册之后,会注册两个对象:
// 1.CarFactoryBean本身在BeanFactory中就是一个&carFactoryBean对象,
// 2.Car在BeanFactory中是carFactoryBean对象
@Slf4j
public class CarFactoryBean implements FactoryBean<Car> {

private String carProperties = "audiA6,300000";


// 返回的对象是
@Override
public Car getObject() throws Exception {
// 这里是FactoryBean创建对象和核心逻辑
String[] properties = carProperties.split(",");
log.info("即将调用CarFactoryBean#getObject创建一个car...........");
return new Car(properties[0],Double.parseDouble(properties[1]));
}

@Override
public Class<?> getObjectType() {
return Car.class;
}

@Override
public boolean isSingleton() {
return true;
}
}

beanFactory.getBeanNamesForType(Car.class)===carFactoryBean

beanFactory.getBeanNamesForType(CarFactoryBean.class)===&carFactoryBean

自定义初始化器initializer拓展#

首先实现ApplicationContextInitializer接口,会有一个initialize(context)方法需要重写。会在resresh()之前进行调用,如:ContextIdApplicationContextInitializer给context设置ID。下面自己实现了一个毫无意义的初始化器:

1
2
3
4
5
6
7
public class MyApplicationContextInitializer implements ApplicationContextInitializer <ConfigurableApplicationContext>{
@Override
public void initialize(ConfigurableApplicationContext applicationContext) {
System.out.println("即将调用refresh---------------applicationContext.getBeanDefinitionNames()=\n");
Arrays.stream(applicationContext.getBeanDefinitionNames()).forEach(System.out::println);
}
}

注册到容器有两种方式:

  • 系统级:

    • 建立META-INF/spring.factories,然后注册,如:

    • # 增加一个自定义初始化器,在new SpringApplication的时候load创建,refresh之前会被调用
      org.springframework.context.ApplicationContextInitializer=com.sam.bootdemo.extend.MyApplicationContextInitializer
      
      1
      2
      3
      4
      5
      6
      7
      8
      9
      10
      11
      12

      这种方式将会在系统启动的时候使用`getSpringFactoriesInstances(ApplicationContextInitializer.class)`方式加载到,然后注册到context中去统一执行。

      - 委派级:

      - 不用创建spring.factories。直接注册到context和系统级的initlitializeri并列,而是委派给另一个`DelegatingApplicationContextInitializer`调用。如:

      - 在spring的yaml或者propertiers中添加如下的属性(多个逗号分割):

      - ```properties
      # 将会被`DelegatingApplicationContextInitializer`解析并反射创建后以一个成员变量list存在。当DelegatingApplicationContextInitializer执行初始化方法的时候,会把这些自定义的初始化器进行排序、然后逐个调用。
      context.initializer.classes=com.sam.bootdemo.extend.MyApplicationContextInitializer

自定义监听器listener拓展#

  • 实现ApplicationListener接口,有一个onApplicationEvent(ApplicationEvent event)方法需要重写。
1
2
3
4
5
6
7
8
9
10
11
public class MyApplicationListener implements ApplicationListener<ApplicationEvent> {
@Override
public void onApplicationEvent(ApplicationEvent event) {
System.out.println(">>>>>>MyApplicationListener监听到一个事件:event source == "+event.getSource());
// 可以根据事件类型判断是否处理
if (event instanceof ApplicationPreparedEvent) {
//XXXX xxx = ((ApplicationStartedEvent)event).getApplicationContext().getBean(XXXX.class);
// 做一些操作,如启动一个调度线程池等等
}
}
}
  • 有一个顶级派发监听器接口叫做SpringApplicationRunListener,他里面有一个实现:EventPublishingRunListener
  • 系统级的EventPublishingRunListener监听器有多拨器SimpleApplicationEventMulticaster
    • 多拨器里面有我们的所有ApplicationListener列表,可以根据supportsEvent方法判断哪些listener支持这个事件,并在doInvokeListener中调用
  • 所有的系统级监听器里面有一个很特殊的DelegatingApplicationListener,和上面的初始化器很像,也是可以委派分发事件。

流程:

  • 容器发生对应的业务场景时调用ApplicationRunListener#starting/environmentPrepared/contextPrepared/contextLoaded/started/running/failed
  • ApplicationRunListener回去调用多拨器向listener分发事件,如ApplicationStartingEvent、ApplicationEnvironmentPreparedEvent、ApplicationContextInitializedEvent、ApplicationPreparedEvent、ApplicationStartedEvent、ApplicationReadyEvent等等
  • 多拨器分发到一个特殊的DelegatingApplicationListener时候,它又去加载和环境中的"context.listener.classes",然后反射创建、排序后向他们转发RunListener发来的事件。

注册到容器:

同上面的初始化器也是两种方式

  • META-INF/spring.factories里面注册